- From the Refine section of the action bar, click Thread/Tap
 . . - In the Lateral Face box, select the cylindrical surface.
Do not select an outer lateral face. - In the Limit Face box, select the face up to which the thread should be created.
- Optional: To reverse the direction, click Reverse Direction.
- Define the standard.
-
Enter a value for the diameter and the depth or use the handles in the 3D area.
The Support Diameter and
Support height boxes are unavailable.
- In the Pitch box, enter a value to define the distance between each crest.
- To define the side of the tap, select either Right-Threaded or Left-Threaded.
- Optional: Click Preview.
Red lines provide a simplified representation. 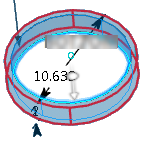 - Click OK.
Note:
You can extract drawings from threads and taps. For more information, see
Drafting User's Guide.
|