Printing

You can print and preview files in ENOVIA using the AutoVue client. The integration supports adding of headers, footers and watermark on the printed files.

This task shows you how to:

Headers and Footers

You can define the headers and footers that you want to print on every page of the document.

  1. From the File menu, select Print.

    or

    From the AutoVue toolbar, click Print.

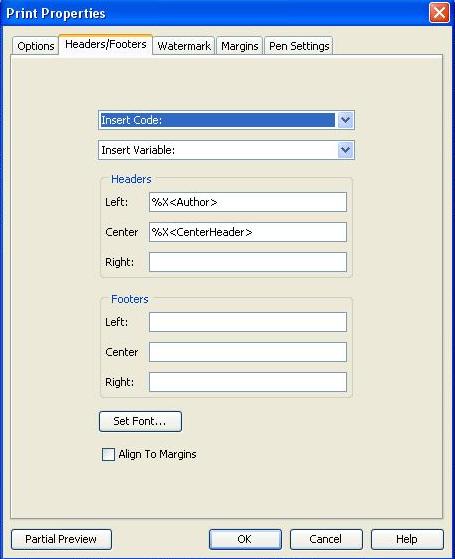
  2. Click the Headers/Footers tab.

    You can enter the text manually or choose from a list of Insert Codes.

    Important: The available code options include the attributes you have configured in the customized ENOVIA Java Programs (JPO). The configured attribute is displayed as %X<attribute>. For more information about the attributes, see Configuring Printing Attributes in AutoVue 2D Viewer Administrator's Guide.
    Important: The options also include the attributes that are added to a object type.


    Tip: You can view the value of the set <attributes> using the Partial Preview option.

  3. You can also print system variables in headers and footers. Select a variable from the Insert Variable list.

    Some Insert Variable options are:

    • user
    • name
    • browser
    • java.home

    Note: You cannot manually insert code for Header/Footer values as they are not executed in ENOVIA integration.

  4. To change the Font, click Set Font.
  5. To view a partial view of the file, click Partial Preview.
  6. Click OK to print.

The result is displayed on the printed page.
Watermarks

You can specify a watermark that will appear on a printed file. When printing a watermark, it appears transparent on the file contents.

  1. From the File menu, select Print

    or

    From the AutoVue toolbar, click Print.

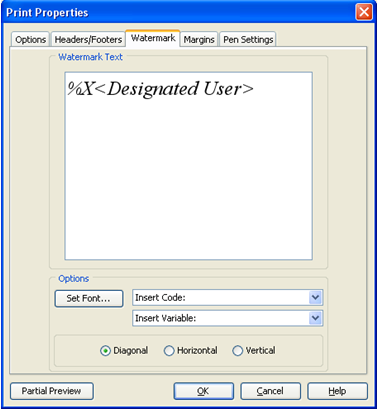
  2. Click the Watermark tab.


  3. Enter the Watermark Text that you want to appear on the file.
  4. To insert a code in the watermark, select a code from the Insert Code list.

    Important: The available code options include the attributes you have configured in the customized ENOVIA Java Programs (JPO). The configured attribute is displayed as %X<attribute>. For more information about the attributes, see Configuring Printing Attributes in AutoVue 2D Viewer Administrator's Guide.
    Important: The options also include the attributes that are added to a object type.

  5. To insert a system variable, select a variable from the Insert Variable list.

    For example, if you select browser.version, the version of the browser that the file is displayed in will appear in the Watermark.

    Note: You can insert more than one system variable.

  6. To set the orientation of the watermark, select from the following options:
    • Diagonal
    • Horizontal
    • Vertical
  7. To change the Font, click Set Font.The Font dialog appears.
    1. From the Font list, select the type of font.
    2. From the Size list, select the size of font.
  8. To view a partial view of the file, click Partial Preview
  9. Click OK to print.

The result is displayed on the printed page.