Creating a Linear Pattern | ||
| ||
-
From the Transform section of the action bar, click Linear
Pattern
 .
.
Tip: In the top menu of the dialog box, you can switch between Linear Pattern and Circular Pattern
 features.
 -
Select the feature options in the
Linear Pattern dialog box.
Option Description 
Array. Creates the pattern of all the possible instances in the form of rectangular array. 
Perimeter. Creates the pattern of all the instances along the path that outlines the pattern. 
Primary. Creates the pattern of all the instances in two primary directions. -
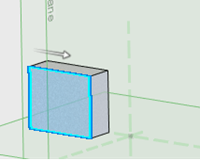
Select the objects to pattern:
While selecting items, you can select features, bodies, or faces from the work area.
- To pattern faces, click in
Features to pattern and select one or more
items from the
work area
to pattern.
- To pattern bodies, click
Body selection and click in
Bodies to pattern and select one or more
items from the
work area
to pattern.
Note: Click Merge results to merge the pattern with the selected bodies.
- To pattern faces, click in
Features to pattern and select one or more
items from the
work area
to pattern.
- Optional:
Under
Direction 1, select a linear edge or axis to
create to set the direction for the pattern.
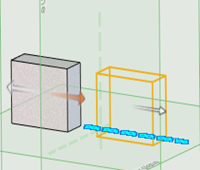
A preview appears in the work area.- Instance spacing
- To set the spacing between each pattern instance, select Instance spacing.
- To set a distance between each pattern instance, enter a value in Spacing.
-
To reverse the direction, click
 .
.
- To create multiple instances of the pattern, enter a value in Number of instances.
- Pattern length
- To set the total distance of the pattern, select Pattern length.
- To set a distance between each pattern instance, enter a value in Length.
-
To reverse the direction, click
.
- To create multiple instances of the pattern, enter a value in Number of instances.
- Optional:
Under
Direction 2, select a linear edge or axis to
create the pattern in a second linear direction.

- Instance spacing
- To set the spacing between each pattern instance, select Instance spacing.
- To set a distance between each pattern instance, enter a value in Spacing.
-
To reverse the direction, click
.
- To create multiple instances of the pattern, enter a value in Number of instances.
- Pattern length
- To set the total distance of the pattern, select Pattern length.
- To set a distance between each pattern instance, enter a value in Length.
-
To reverse the direction, click
.
- To create multiple instances of the pattern, enter a value in Number of instances.
- Optional:
You can change or review the feature pattern options at the top of
Linear Pattern dialog box.
Option Description Array. Creates the pattern of all the possible instances in the form of rectangular array. Perimeter. Creates the pattern of all the instances along the path that outlines the pattern. Primary. Creates the pattern of all the instances in two primary directions. -
You can perform following optional steps:
- Select one of the following:
-
To place the selected feature at the pattern center, select
Symmetry.
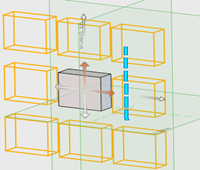
-
To skip creation of a specific instance, select
Skip instances.

The white dots appear on each instance. You can click a dot to skip particular instance from the pattern.
-
Click
 .
.