Creating the Laminate

You can create either an On-Line laminate or a Pre-Assembled laminate depending on the manufacturing constraints.

This task shows you how to:

Start the Laminate Creation

The creation process starts the same way for both types.

  1. From the Model section of the action bar, click Laminate .
  2. Select the parent layers group.
  3. Optional: Edit the name of the laminate.
  4. Choose a laminate type and proceed as explained below.
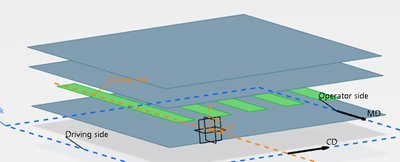
  5. Select a type of representation to specify how elements are displayed in the elevated view.

    In the examples below, we consider the green elements.

    • Step: The elements are displayed on different levels.

    • Planar: The elements are displayed on the same level.

  • The Laminate feature is created in the current layers group defined as work object if any, or in the last layers group of the stacking otherwise.
  • It is identified by its type.
  • It contains a Material Properties feature, a parameters set and a relations set.
  • Material properties show the materials of their elements.
    Note: An on-line type laminate does not have its own material, but displays addition information on the elements such as the total area density, the maximum width and the total thickness.

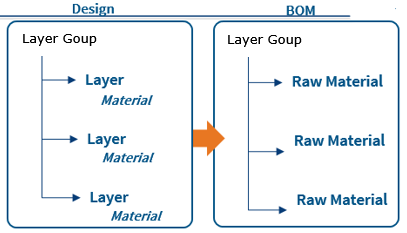
The On-Line Laminate feature behaves as a group in review (Delegates the actions to its elements).

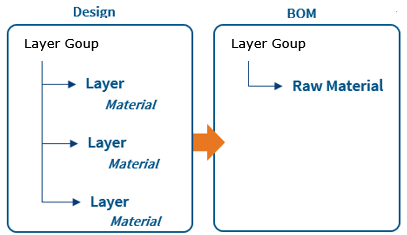
The Pre-Assembled Laminate features only provide the information at the level of the laminate.

Create an On-Line Laminate

You can create an on-line laminate where you use one material per layer.

  1. Click Add Element and select elements from the tree or from the 3D area.

    Added elements can be:

    • Layers of any type (normal, density, relation, fold, …)
    • Mechanical bonds.

    If you select a layers group, all valid elements of the layers group are added.

    Note: A laminate cannot contain another laminate.

  2. For each element, select a material, either from the proposed list or using the Content Chooser.
  3. Use the arrows to reorder the elements.
  4. Click to remove an element.

    • Delete element: The element is deleted permanently from the model.
    • Remove element from laminate: The element is removed from the laminate, but still available.

Create a Pre-Assembled Laminate

You can create pre-assembled laminate where the same material is applied to multiple layers.

  1. Select the material, either from the proposed list or using the Content Chooser.
  2. Set Element Material Type to Existing to add elements and material as explained in Create an On-Line Laminate.
  3. Select Custom to create custom materials for each layer.

    The materials are unique to the layer and can be edited only within Laminate.

  4. For each element, click and enter the properties of the material.
    • Material width
    • Area density
    • Thickness
    • Repeated length