Subdivision Work Area Shortcuts

When working in the Subdivision action bar, several handy shortcuts are available to you in the work area.

This page discusses:

Subdivision Work Area Options

The Subdivision work area provides options to display, hide, or select mesh items used to modify the shape.


You can drag the mesh points and faces to customize the shape. To assist with selecting the mesh entities, the following options are available.

Button Function


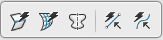
Advanced Robot. Manipulates elements of the subdivision.
Knit to solid. Knits the current model to a solid.
Note: This is turned off by default.


Transparency. Sets the transparency of the subdivision.

When Transparency is selected, a slider appears allowing you to set the transparency from 0 to 100 percent.

Note: When the Transparency is not selected, the subdivision is 100 percent opaque.


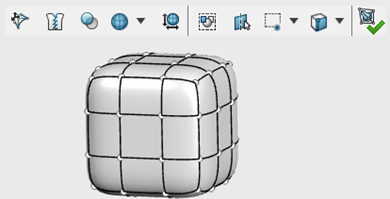
Show surface only. Displays the mesh surface.


Show cage and surface. Displays the mesh cage and surface.


Show cage only. Displays the mesh cage.
Show bounding box. Displays the outermost dimensions of the current active subdivision body.
Select only visible elements. Filters out the mesh items in back, not visible in the display.


Select external geometry. Allows selection of geometry external to the subdivision environment.
New selection. Enables a new selection.
Note: This is applicable only for box selection.
Add to selection. Adds any subsequent selection to any existing selection.
Note:
  • Add to selection is applicable only for box selection.
  • Shift + box selection is the shortcut for this ability.
Subtract from selection. Removes any subsequent selection from any existing selection.
Note:
  • Subtract from selection is applicable only for box selection.
  • Alt + box selection is the shortcut for this ability.
Any Entities. Selects any mesh entities.
Vertices. Selects vertices.
Edges. Selects edges.
Faces. Selects faces.
Note: Press o to select the faces around the subdivision. Click near an edge of the face, to select the direction of the loop.
Edge Rings. Selects the ring edges of a loop.
Note: Press i to select the ring around the subdivision.
Edge Loops. Selects the edge of a loop.
Face Loops. Selects the faces of a loop.
Note: Press o to toggle the direction of the loop.


Exit the environment. Exits the environment.

While editing any subdivision body, when you select any planes, origin, coordinate system, reference point, planar model face, or model vertex, you can click Center On to align the centroid of the subdivision body over the selection.

Subdivision Keyboard Shortcuts

The Subdivision keyboard shortcuts are key combinations that are only available when working with Subdivision items in the work area.

You can use Shift + Select to select entities on a subdivision body. When shift selecting entities on a subdivision surface, if the entities do not fall into the same mesh ring or loop, then it take the shortest distance.

Shortcut Function
Esc Exits the command.
Delete Quickly removes faces or edge loops.

When you select an edge and press Delete, the entire loop belonging to that edge is deleted.

Double-click
Subdivision Action Bar Commands
Applies the current command and enables you to use the command again.
Subdivision Entity Selections
Double-clicking an edge of the active subdivision body selects the entre edge loop.
Double-clicking a face of the active subdivision body selects the entre face loop.

Tip: Click the edge of the face to select the direction of the loop.

q
Subdivision Action Bar Commands
When creating subdivision, cycles through the orientation of the subdivision on the various planes.

After you click the 3D or 2D subdivision button in the action bar and see the subdivision in the work area, repeatedly press q to cycle through the orientation of the subdivision on the various planes.

Subdivision Entity Selections
When selecting mesh entities, cycles through alternative solutions with your selection.

After shift selecting subdivision entities in the work area, press q to select alternative solutions.

m
Subdivision Action Bar Commands
When creating subdivision, press m to toggle the subdivision shape in and out of the mid-plane position.
i
Subdivision Entity Selections
Selects the ring of edges after selecting the first subdivision edge.
Selects the ring of faces after selecting the first subdivision face.
o
Subdivision Entity Selections
Selects the loop of edges after selecting the first subdivision edge.
Selects the loop of faces after selecting the first subdivision face.

Tip: Press o again to select the faces going in the other direction.

Shift + face
Subdivision Entity Selections
Select a face and press the Shift key and click on non-consecutive faces to automatically select the faces between the selections.

After shift selecting subdivision entities in the work area, press q to select alternative solutions.

Select 1+N number of vertices, a sketch curve, curve, axis, or model edge Shows the shortcut for Align to Edges and Curves on the context toolbar.
Select 1+N number of faces, edges, or vertices and a model face or plane Shows the shortcut for Align to Geometry on the context toolbar.
Select 1+N number of faces, edges, or vertices and a model face Shows the shortcut for Align to Body on the context toolbar.
Select 1+N number of edges or the faces on the subdivision body Shows the shortcuts for Collinear, Parallel, Orthogonal on the context toolbar.
Select 1+N number of vertices of the subdivision body Shows the shortcut for Align Vertices to each other on the context toolbar.

Subdivision Quick Command Context Toolbars

The Subdivision work area provides context toolbars for quick access to common functions available with the selected mesh item.

At any point if the context toolbar disappears, right-click anywhere in the work area to make it reappear.

Depending on what you select in the subdivision mesh, various context menus are available to you. As product enhancements are released, other options might be available. The following are a few of the possible context toolbars.

Context Toolbar Availability
Select from these options when you have a reference plane selected while editing a subdivision body.
  • or Show or Hide. Shows or hides the selection.
  • Normal To. Orients the view normal to the selected plane or face.
  • Center On. Aligns the centroid of the subdivision body over the selection.
  • Symmetry. Adds symmetry based on the planar face selected.
Select from these options when you have a single subdivision edge or planar model face selected while editing the subdivision body.
  • Crease Edges.
  • Extrude.
  • Subdivide Faces.
  • Symmetry. Adds symmetry based on the planar face selected.
  • Align Entities by Line. Aligns the selected objects to a line.
  • Quick Align. Aligns the selected objects with sketched entities.
Select from these options when you have an edge selected while editing the subdivision body.
  • Crease Edges.
  • Insert Loops.
  • Symmetry. Adds symmetry based on the planar face selected.
  • Align Entities by Line. Aligns the selected objects to a line.
  • Quick Align. Aligns the selected objects with sketched entities.
Select from these options when you select external planar entity or the plane is centered on the subdivision.
  • Center On. Aligns the centroid of the subdivision body over the selection.
  • Symmetry. Adds symmetry based on the planar face selected.
Select from these options when you have multiple faces selected in the subdivision mesh.
  • Crease Edges.
  • Uncrease Edges is available when a creased edge is selected.
  • Extrude.
  • Subdivide Faces.
  • Align Entities by Line. Aligns the selected objects to a line.
  • Quick Align. Aligns the selected objects with sketched entities.
  • Align Coincident. Aligns the selection to be coincident to the first selected entity.
  • Align Collinear. Aligns the selection collinear to the first selected entity.
  • Align Parallel. Aligns the selection parallel to the first selected entity.
  • Align Orthogonal. Aligns the selection to be orthogonal to the first selected entity.


Select from these options when you have multiple edges selected in the subdivision mesh.
  • Align Cage Points. Available when edges from two subdivision faces are selected.
  • Merge. Available when edges from two subdivision faces with open loops are selected.
  • Crease Edges.
  • Uncrease Edges is available when a creased edge is selected.
  • Insert Loops.
  • Fill Edges is available when an edge of a hole is selected.
  • Extrude.
  • Align Entities by Line. Aligns the selected objects to a line.
  • Quick Align. Aligns the selected objects with sketched entities.
  • Align Coincident. Aligns the selection to be coincident to the first selected entity.
  • Align Collinear. Aligns the selection collinear to the first selected entity.
  • Align Parallel. Aligns the selection parallel to the first selected entity.
  • Align Orthogonal. Aligns the selection to be orthogonal to the first selected entity.
Select from these options when you have multiple vertices selected in the subdivision mesh.
  • Align Entities by Line. Aligns the selected objects to a line.
  • Quick Align. Aligns the selected objects with sketched entities.
  • Align Vertices to each other. Aligns the selected vertices to each other.
Align to Geometry. Aligns vertices to selected upstream geometry.
Note: This appears when you select multiple subdivision vertices, press Ctrl key and select a plane or model face.
This appears when you select multiple subdivision vertices, press Ctrl key and select a face.
  • Align to Geometry. Aligns vertices to selected upstream geometry.
  • Align to Body. Aligns vertices to the selected upstream body.
Align to Edges and Curves. Aligns the vertices to edge or curve entities.