Creating a Circle with a Center and a Point | ||
| ||
-
From the
section of the action bar, click
Circle
 .
.
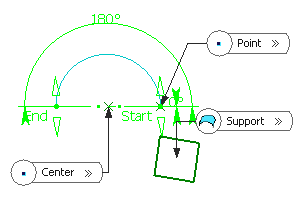
- In the Circle type list, select Center and point.
- In the Center box, select a center point.
- In the Point box, select a point through which the circle passes.
-
In the Support box, select a plane or surface.
Note: To project the circle onto the support plane or surface, click
 .
.Important: Both points should lie on the support element. The circle, of which center is the first selected point and passing through the second point or the projection of this second point on the plane tangent to the surface at the first point, is previewed.Depending on the active Circle Limitations, the corresponding circle or circular arc is displayed. For a circular arc, you can specify the Start and End angles of the arc.

- To specify the axis computation mode, select the Axis computation check box.
-
Click OK to create the circle or circular arc.
The circle (identified as Circle.xxx ) is added to the tree.