Assign an AEC Type
You can assign an AEC type to bodies and GSD features which get colored. Thanks to this visualization, you can distinguish which entity has not been typed. Then you can define a specification from a feature so that it can be instantiated later as a product.
Typing a feature with an AEC type does not change the nature of the feature, for instance its representation in the tree remains the same.
-
From the
Civil Engineering
section of the
action bar, click Define Specification
 .
.
The Define Specification dialog box opens.
The assignment results in a feature extension added on the typed feature in the tree and bearing the name of the targeted AEC type. A publication is also created either at the 3D Part level or at the 3D Shape level. Thanks to this publication, a typed-feature can be recognized by the Change Level of Development command and then exposed at the PLM Level.
The typed-feature is also extended with business extensions (IFC/OmniClass/UniFormat for example) as described by the BIM Manager for LOD 100. For more information, see Building and Civil Assemblies User's Guide: Using the BIM Manager Editor.
In addition to the feature extension and the publication, a Base Axis System is created and aggregated under the typed feature in the tree. This axis system is used when changing the level of development to set a connection between the feature and the PLM object. It is located at creation on the feature geometry, as close as possible to the gravity center. After creation, the axis position is not updated when the feature geometry is changed.
Note: When aggregated under a GSD feature, the axis system cannot be deleted alone. When aggregated under a body, it can be deleted. In this case, the typed feature cannot be exposed. To restore the axis system, use the Define Specification command again. - Optional: Once a type is chosen, select an Object Type to define the feature, using Search
 , and extend the feature with the appropriate IFC/OmniClass/UniFormat extensions.
 -
Optional: To display a preview of the selected object type in a side
panel, click Template Helper
 .
A template viewer opens next to the Define Specification dialog box and displays the shape of the object type and axis systems.
.
A template viewer opens next to the Define Specification dialog box and displays the shape of the object type and axis systems.
In the Helper, you can move and zoom in the object type. Click again the same input and the object type moves back to its initial position.
To close the Helper, click
 or Close or
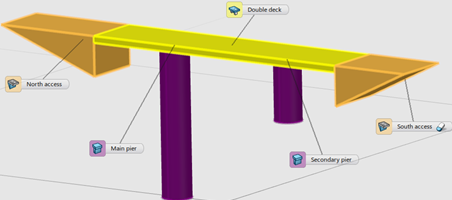
 - Select bodies or GSD features in 3D area or in the tree.The feature is typed. In the 3D area, it is represented by a flag that displays the color, the type of geometry, and the name of the typed feature. There is one color per type (for example: 2 Piers have the same color).
-
Hover over the flag,
- To see the name of the chosen type.
- To un-type and remove the feature, click
 .
.
- To end the command and validate your modifications, click OK.You can also discard the changes by clicking Cancel or
 , or pressing Esc.
 .
.
 and choose from the status options.

