Description
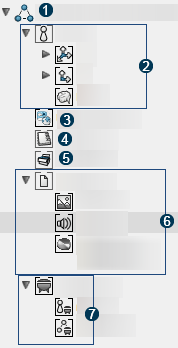
Each number identifies a specific area in the image below. Areas are described in the following table.

| Number | Element | Description |
|---|---|---|
| 1 | Experience node (Root node) | Includes actors, scenarios, resources, and collections. |
| 2 | Actors node | Lets you view and manage actors (renaming, visibility, selection...). |
| 3 | Environments node | Lets you view and manage environments (ambiences or planetary environments). |
| 4 | Storytelling node | Lets you view and manage scenarios. |
| 5 | Collections node | Lets you view and manage collections. |
| 6 | Resources node | Lets you view and manage resources (images, sounds, or materials). |
| 7 | Templates node | Lets you view and manage templates. |
In the Project panel, you can perform the following actions:
| Action | Instruction |
|---|---|
| Expand or collapse a tree node | Click the arrow in front of it. |
| Show or hide an actor, scenario, resource, or collection | Click the eye next to it. |
| Allows or prevents manipulation of an actor | Click the pointer next to it. |
| Rename an experience, actor, scenario, resource, or collection | Select it and press F2. |
| Highlight an actor the 3D area | Select it in the tree. |
| Highlight an actor the tree | Select it in the 3D area. |
| Display an actor's properties in the Properties panel. | Select it in the 3D area or in the tree. |
| Edit an actor, scenario, resource or collection | Right-click it in the 3D area or in the tree. |
| Create a hierarchy | Drag a 3D actor to another 3D actor. |