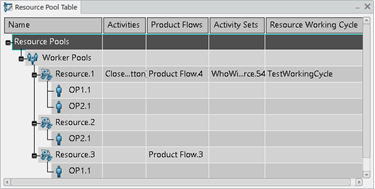
-
From the Programming section of the action bar, click
the Resource Pool Table command.
-
In the Resource Pool Table that appears, right-click the
Resource Pools row, then click Add
Resource Pool.
-
Select the resource you plan to assign in the tree or the work area, then click
Validate
 to validate your choice. to validate your choice.
-
To edit the new resource pool, use the Resource Pool
dialog box to modify the resource pool's Name and
Type attributes. Then use the Resource
Selection command to assign additional resources to the pool and
the Remove Resource command to remove the resource from
the pool.
-
Click OK to close the Resource Pool
dialog box.
-
To delete a resource pool in the Resource Pool Table,
right-click a resource pool and click Delete Resource
Pool.
-
To remove a resource from a pool in the Resource Pool
Table, right-click an assigned resource in a pool that contains
multiple resources. Then click Remove from this Resource
Pool.
-
To move a resource to another pool in the Resource Pool
Table, right-click an assigned resource in a resource pool, and
click Move to another Resource Pool. Then select the
required resource pool and click Move.
-
To copy a resource to another pool in the Resource Pool
Table, right-click an assigned resource in a resource pool and
click Copy to another Resource Pool. Then select the
required pool and click Assign.
You have created, edited, deleted, and managed resource pools.
|
 to validate your choice.

