Create a Shift Model
-
In the Shift Models panel, click
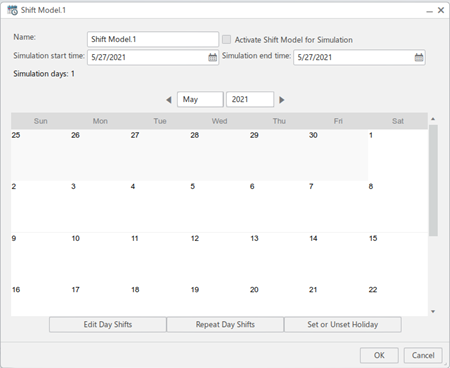
 . A calendar
view displays. In this view, each day node corresponds to a day starting at
00:00 and ending at 23:59:59. . A calendar
view displays. In this view, each day node corresponds to a day starting at
00:00 and ending at 23:59:59.
-
Define the following parameters:
- Set the shift model's Name
- Select or clear the Activate Shift Model for
Simulation option to activate or deactivate the
shift model
- Set the shift's duration in Simulation start
time and Simulation end time.
As a result, the Simulation days's counter is
updated.
- Optional:
You can define holidays, on which nodes there can be no shifts: click a day
node, then click Set or Unset Holiday. Press
Ctrl to select multiple day nodes.
The holiday nodes display in color. Notes:
- To unset a holiday, repeat the operation.
- To change the holiday nodes' color, use the Holiday
cell color option in
.
-
Click OK to save the shift model.
The created shift model displays in the Shift
Models panel. 
To edit the shift model, double-click it, or click
it then click  . To delete it,
click it then click  . To
activate/deactivate a shift model, right-click it and click
Activate/Deactivate.
Edit a Shift
You can edit
individual shifts inside a shift model.
Before you begin: In the Shift Models panel,
double-click a shift model, or click a shift model then click  .
-
In the calendar view, double-click a day node, or click a day node then
click Edit Day Shifts.
A dialog displays with the following columns: Shift
Name, Resources, Resource
Zones, Start Time, End
Time. Note:
A shift may overlap to the next day. In this case,
an additional shift is created.
-
Click
 to create a new
shift on the date. to create a new
shift on the date.
-
Set the shift's Name, Start Time,
and Duration.
Note:
To display the End Time instead of the
Duration, activate the Input End Time
instead of Duration option in
.
-
Set Shift End Behavior to either:
-
To assign one or several resource zones to the end of the shift, click
Assign in the Resource Zones at End of
Shift section of the panel and select them in the
Select Resource Zones dialog that displays or in
the 3D view. Click OK.
The assigned resource zones display in the Resource Zones
at End of Shift section of the panel. To to unassign a
resource zone, click it then click
Unassign.
-
To associate one or several resources (workers and machines) to the shift,
click Add and select them in the Select
Resource dialog that displays or in the 3D view. Click
OK to validate the selection.
Note:
If the Assign all valid Resources to Shift when
created option is selected in
, all eligible resources are automatically assigned to the
shift when a new shift is
created.
The associated resources display. To activate or deactivate a
resource, click it then click Activate/Deactivate
(deactivating does not remove the association of the resource to the
shift). To remove a resource, click it then click
Remove. Note:
You can unassign all
children resources from the shift by clicking
Remove then clicking the parent resource in
the PPR tree or in the 3D view.
-
Click OK.
The shift displays in the dialog. 
- Optional:
If several shifts are created for the day, you can click
 to display
them all then select them according to requirement. to display
them all then select them according to requirement.
-
Click OK.
The shifts display in the day node in the calendar view. Hovering
the mouse on the day node displays the shifts's detail: start time, end
time, and breaks if applicable. 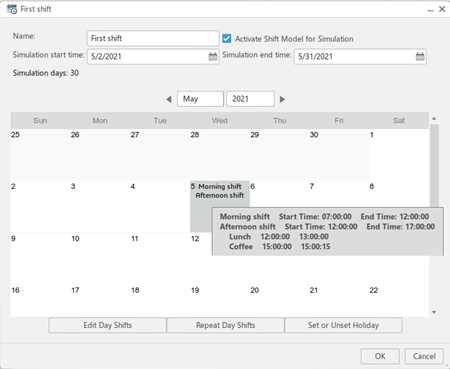
- Optional:
You can repeat shifts: click a day node on which at least a shift is
defined, then click Repeat Day Shift.
In the dialog that displays, define the Start Date,
End Date, which shifts to repeat, and the
Days on which to repeat them. Note:
Click
Reset Days Shift to remove existing shifts
from the day nodes and replace them with the repeated
shifts.
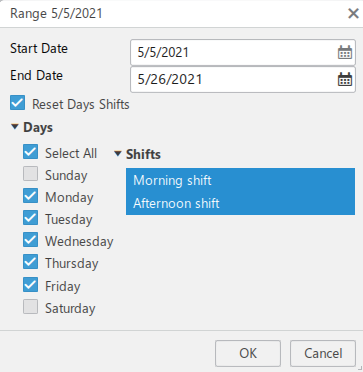
Click OK.
The shifts defined on the day node are repeated on the specified
days nodes. 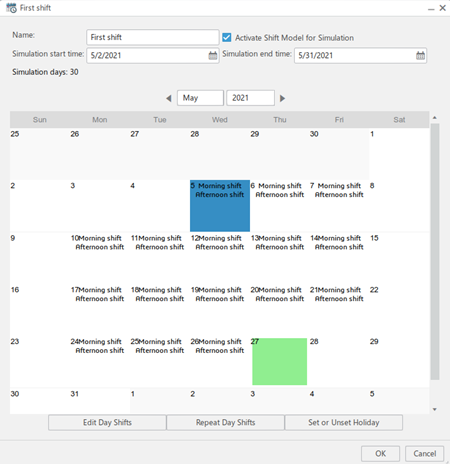
Create Breaks in a Shift
You can create breaks in a shift.
Before you begin: In the Shift Models panel, click
 to create a new shift, or  to edit an existing
shift.
-
Click Add in the Breaks section
of the panel.
-
Set the break's Name, Start Time,
and Duration.
Notes:
- A break may overlap to the next day. In this case, an additional
break is created.
- To display the End Time instead of the
Duration, activate the Input
End Time instead of Duration option in
.
-
Set Break Start Behavior to either:
-
To associate one or several resource zones to the break, in the
Resource Zones part of the panel, click
Assign and select them in the Select
Resource Zones dialog that displays.
-
To assign one or several resources to the break, click
Add and select them in the Select
Resource dialog that displays or in the 3D view. Click
OK to validate the selection.
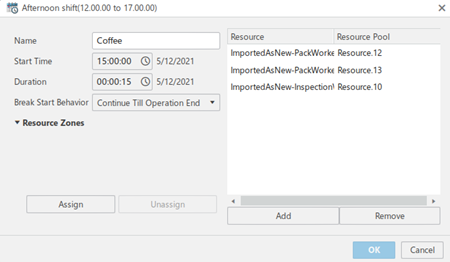
The assigned resources display. To remove a resource, click it then
click Remove. Note:
When a new break is created on a
shift with preassigned resources, these resources are automatically
assigned to the created break.
-
Click OK to save the break.
The break displays in the Breaks section of the
panel. 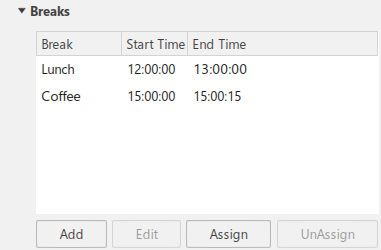
To edit it, click it then click Edit. To
assign it, click it then click Assign. To unassign
it, click it then click UnAssign.
|
 . A calendar
view displays. In this view, each day node corresponds to a day starting at
00:00 and ending at 23:59:59.

 > Preferences > App Preferences > Simulation
Virtual Factory > Factory Flow Simulation > Shift Model.
 . To delete it,
click it then click
  . To
activate/deactivate a shift model, right-click it and click
Activate/Deactivate.


