Simulate a Task
You can simulate a task without leaving the Teach environment.
Edit a Task
You can edit the name and type of task.
-
In the Teach panel, right-click on the task node and
select Edit from the context menu.
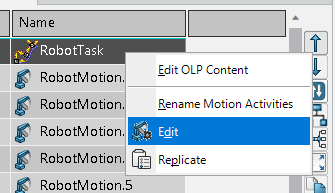
The Edit Task panel appears.
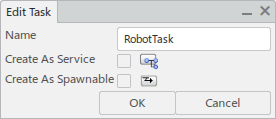
-
You can edit the name of the task, as well as select whether the task is a
service (not local to the selected resource, can be called in the
organizational resource) and is spawnable (can be called from the main task,
can be run in parallel with the calling task).
-
Click OK to close the Edit Task
panel.
Edit a Robot Motion Target
You can edit the target of a robot motion in Teach.
-
In the Teach panel, select the operation that you want
to edit.
The robot moves to the target of the selected operation.
-
In the work area, manipulate the tag until the robot can reach it.
-
Click Modify Current Target
 to record the modification. to record the modification.
If the robot cannot reach a tag, the orientation Robot snaps to the tag. You can manipulate the orientation Robot to orient the tag into a position that the robot can reach it. The
robot snaps to the tag when it becomes reachable.
Robot motions with a Home target can also be modified with
Modify Current Target
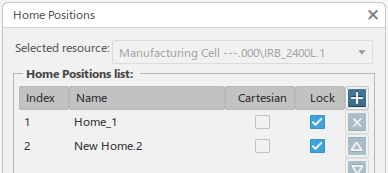
 . Only Home Positons that are not locked
can be modified. The lock status of defined Home Positions can be viewed
in the Home Positions dialog box, accessible by
clicking Home Positions . Only Home Positons that are not locked
can be modified. The lock status of defined Home Positions can be viewed
in the Home Positions dialog box, accessible by
clicking Home Positions
 in
the Setup section of the action bar. in
the Setup section of the action bar.
Edit, Copy, and Paste Motion Attributes
Parameters in the table are editable inline. Changes made are reflected
immediately.
-
Double-click a parameter value.
The value becomes editable.

-
Enter a new value and press Enter.
The new value appears. If the parameter change affects values of other
parameters (such as a change in target Cartesian values affecting target
Joint values), they are updated automatically. You can edit both TCP
target and DOF (Joint value)

When a cell is in an editable state, its value can be copied from and
pasted to.
-
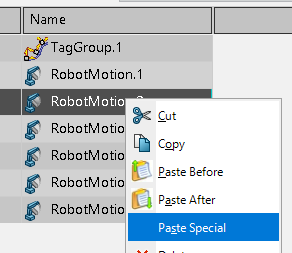
In the Teach table, right-click a robot motion and select
Copy from the context menu.
-
Right-click the robot motion that the copied motion will be pasted before
or after.
- Select Paste Before to paste the copied
motion immediately before the selected motion in the Teach
table.
- Select Paste After to paste the copied motion
immediately after the selected motion in the Teach table.
- Select Paste Special to choose whether only
the operation or both the operation and target are pasted.
When Paste Special is selected, the following
dialog box appears.

The following paste options are available:
- Before pastes the copied operation before the
selected instruction.
- After pastes the copied operation after the
selected instruction.
- Operation only pastes the copied operation
without creating new target.
- Operation and Target pastes the copied
operation and creates a new target (tag, home position) at the same
location. The newly created tag or home position is set as the
target to the pasted operation.
Notes:
- Operation and Target applies only for
robot motions.
- When Operation and Target is selected, a
new tag is created under the current tag group. If the current
tag group is not available, the new tag is created under the
source tag group.
-
Click OK.
The copied motion is pasted according to the options selected.

Comment Instructions
You can comment specific instructions in the table that are then skipped during
simulation.
-
Right-click an instruction in the Teach table and select
Comment from the context menu.

The instruction appears commented with a // prefix, and will be ignored
during simulation.

-
Right-click the commented instruction and select
Uncomment to restore the instruction
behavior.
Switch Between Tasks
When multiple tasks are defined for a given robot, you can edit another task from
the same Teach panel session.
-
Right-click the task node in the Teach panel and
select another task from the context menu.
You can also double click the task node to display a list of tasks for the
current resource, and select the task to switch to it.

The Teach panel opens the selected task.
-
Optional: To re-open the original task, repeat the previous
step.
Replicate a Task
You can copy tasks across resources.
Many scenarios involve working with left- and right-hand versions of a given task.
You can program one side and copy the task to the other side. Other scenarios
require duplicate fixtures that need to be programmed in different locations. Rather
than recreating the program, you can copy the task and generate new tag points or
trajectories automatically.
-
Right-click the task node in the Teach panel and
select Replicate.
-
Select the target robot to paste the task.
The Task copy across controllers dialog box
appears. Map the items to be copied from the source device to the
target device, including:
- Motion groups
- Motion controller attributes
- Controller profiles
- Home positions
You can also define the trajectory reference and how
trajectories are copied. -
Click OK to replicate the task on the target
device.
Copies of the replicated task and associated trajectories/tag groups
appear in the Behavior
side tab
Save a Partial Task Template
You can save partial template of selected instructions.
-
From the Teach panel, select one or more instructions
to be templated.
-
Right-click the selected instructions and select Save To
Library from the context menu.

The Save Template to Library dialog box appears.
-
Enter a Name for the template, and specify if it is
to be saved to a New or
Existing library.
-
Click OK.
A Template successfully saved to library notification
appears.
Edit a Called Task
You can select Teach from the context menu of any
ProcedureRun or ServiceCall to open a Teach panel for the
selected task.
-
Right-click a called task in the Teach panel and
select Teach from the context menu.
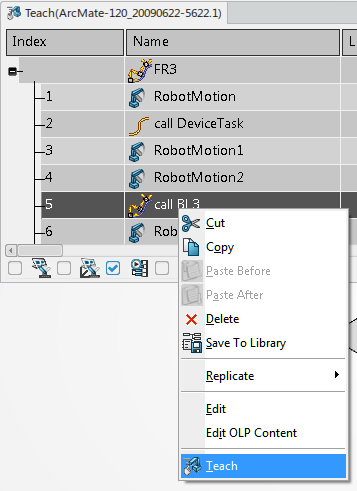
If the called task is from another resource, a new panel is opened. If
the called task is in the same resource, the current panel switches to
teach the called task.
-
You can switch back to teaching the original task by selecting
Teach Caller Task from the context menu of the
task node.
-
When a called task is opened from the Behavior
side tab, right-click the task node to display the tasks that call it in the
context menu.
Insert a Home Target
You can insert a Home target from the Teach context menu.
-
In the Teach table, select a reference instruction.
-
In the Teach context menu, click Insert Home Target
 . .
A new robot motion is inserted with a Target of
Home Position.

If the current robot and Aux device position matches any existing defined
Home position, the existing Home position is used as the target.
Otherwise, a Group Home position is created based on the current DOFs
and is assigned to the robot motion and aux device target.
Insert a Spot Operation
You can insert a spot operation in Teach Mode.
-
In the Teach panel, select the position in the program
to insert the spot operation.
-
In the context toolbar, click Insert a Spot Operation
 . .
You are prompted to select a spot or design weld.
-
In the work area, select a spot or design weld.
A spot operation appears. If the robot has a weldgun mounted, a spot welding
operation is created task with the current active profiles. If a Servo
gun is mounted, the spot operation points to a spot profile. In the case
of an air gun, the spot operation points to a spot weld task (weldgun
task). A default profile is created while creating the spot operation if
no spot profiles are available. If multiple spot profiles are available,
the first spot operation created points to the first spot profile, by
default. If no weld gun tasks are available, a default task is
created while creating the spot operation. If multiple weld gun tasks
are available, the first spot operation created points to the first weld
gun task, but default. If you set a different weld gun task to the spot
operation (by double-clicking the spot operation), all subsequent spot
operations point to the newly set weld gun task.
Edit a Spot Task
You can edit a spot task in Teach Mode.
-
In the Teach panel, select a spot
operation.
The Robot TCP moves to the corresponding manufacturing spot
weld.
-
Right-click on the spot operation to edit its properties.
You can:
- Associate a different spot profile to the spot operation (for Servo
guns).
- Associate a different weld gun task (for air guns).
- Create a new spot profile (for Servo guns).
- Create a new weld gun task (for air guns).
- Edit an existing Spot Profile.
Insert an Arc Operation
This task shows you how to insert an arc activity.
-
In the Teach panel, select the position in the
program to insert the Arc activity.
-
In the context toolbar, click Insert an Arc Operation
 . .
An arc operation is created.
|