Using Trigger Instructions

Triggers are used to activate asynchronous events as a robot is moving to a target position. These activated events often change the state of an external device that is attached to the robot, such as turning on/off an attached paint gun or changing its spray pattern.

A trigger instruction can be created anywhere within a robot task, and applies to the simulated motion that follows it in the task. This motion could be immediately following the trigger instruction in the task, part of a condition or loop, or could be inside a called robot task.

Multiple trigger instructions can be created in sequence. The information contained in sequential trigger instructions is applied together when the next motion instruction is simulated.

A trigger contains the following information:

  • Name
  • Condition Type (None, Time, Distance, Plane)
  • Condition Value
  • Action Type
  • Action Values

A trigger instruction includes the following components:

  • Trigger Firing Condition: The condition that is required to be satisfied for the event/action associated with the trigger to execute.

    If you select a condition of type Time and specify a time value, the action is triggered the specified time after the next motion has ended. Specifiying a negative time value results in the action being triggered the specified time before the next motion has ended.

    If you select a condition of type Distance, the trigger will fire the specified distance from the next motion target. If a negative value is specified, the trigger is fired the specified distance before the next motion target.

    If you select a condition of type Plane, the action is triggered when the robot TCP crosses the specified plane. The plane can be specified relative to the World, RobotBase, or a user-selected reference object.

    If you select a condition of type None, the trigger action occurs at the next motion target.

  • Trigger Action: The action that is executed when the trigger firing condition is satisfied.

    The moment the trigger condition is satisfied, an action is triggered. Actions can be of four types:

    Nozzle Activation: To switch a particular Gun/Brush ON or OFF.

    Change Parameters: To change parameters of a profile.

    Set Variable: To set a value on an IO or variable.

    Spawn Task to select a defined task to spawn from a list.


Before you begin: You have a robot task open in the Teach environment.
  1. In the Teach table, select an instruction after which you want to create a trigger instruction.

  2. From the Logic tools panel in Teach, click Create Trigger Instruction .
    The Trigger dialog box appears.

  3. Optional: Enter a Name for the trigger.

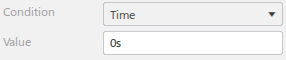
  4. Select the Condition type that will activate the trigger.

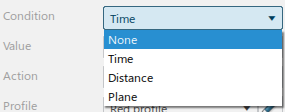
    The options provided in the dialog box are reconfigured based on the selected Condition.

    Selecting Time or Distance provides a time or distance Value that you can specify:


    Selecting Plane allows you to define the plane coordinates and select a reference for them:

  5. Select the Action that will occur when the trigger is activated.

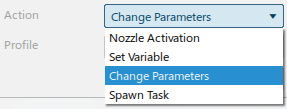
    The options provided in the dialog box are reconfigured based on the selected Action.

    When Nozzle Activation is selected, you can set the nozzle ON or OFF:

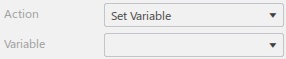
    When Set Variable is selected, you can select a defined variable to set from the Variable list:

    Change Parameters provides a list of profiles that you can select to change parameters from:
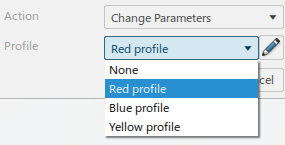
    Click Edit profile to display the profile's dialog box and select parameters to edit.

    When Spawn Task is selected, you can select a defined task from the Spawnable Task list and specify a Job ID:

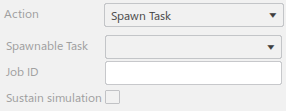
    Select Sustain simulation to sustain the simulation as long as the job is not finalized.

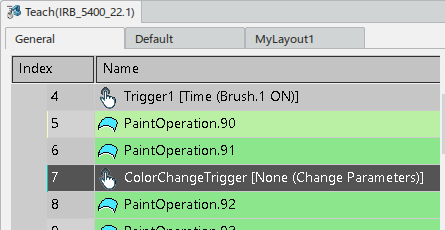
  6. Click OK to create the trigger instruction.
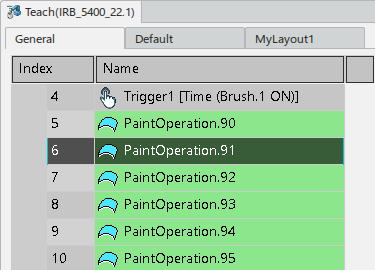
    The defined trigger instruction appears in the Teach table at the selected location:

  7. Optional: To edit an existing trigger instruction, right-click the instruction in the Teach table and select Edit from the context menu to display the Trigger dialog box again.