Importing and Exporting License Authorization Rules

This section explains how to back up license authorization rules and corresponding data (users, hosts, groups) by exporting the data to an XML file, and how to import an XML file containing previously backed up authorization data.

This task shows you how to:

Export Authorization Rules

  1. Select the Authorizations tab.

    A toolbar is located in the top right corner of the tab:
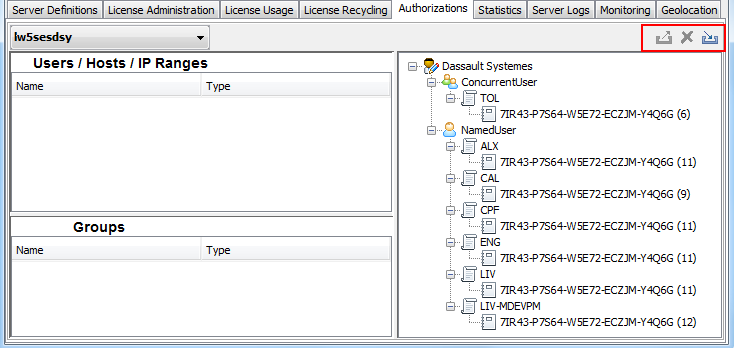
    The toolbar looks like this :

    The first two buttons, from left to right (Export and Reset) are grayed out because at this stage you do not have any authorization data to export. However, the Import button is activated since you can at least import authorization data backed up in an existing XML file.

  2. Create some users, hosts, IP ranges and/or groups, and create some authorization rules linked to the data you created (as explained in Setting License Authorization Rules).

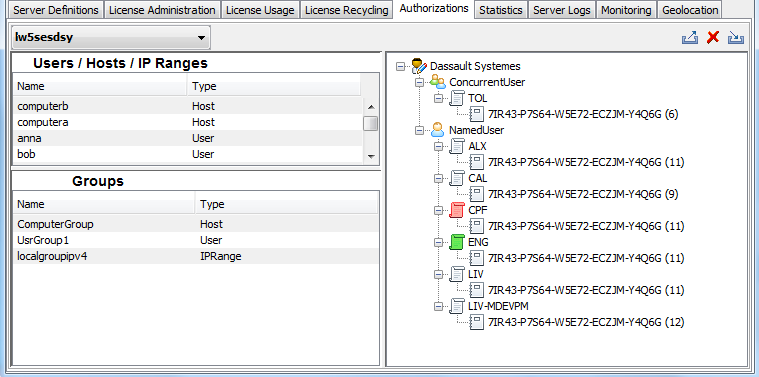
    Once you have created all the data and rules, all the icons are activated like this:

  3. Click the Export button and specify a file name in the dialog box displayed to save the file to XML format.

    The XML file is structured as follows, for example:

    <?xml version="1.0" encoding="UTF-8" standalone="yes"?>
    <authorizations xsi:schemaLocation="http://www.3DS.com/DSLS DSLSAuthorizations.xsd" xmlns="http://www.3DS.com/DSLS" xmlns:xsi="http://www.w3.org/2001/XMLSchema-instance">
    <users>
        <user id="1">anna</user>
        <user id="2">bob</user>
        <user id="3">chuck</user> 
    </users>
    <usergroups>
        <usergroup id="1">
              <name>UsrGroup1</name>
              <user id="1"/> <!-- anna -->
              <user id="2"/> <!-- bob -->
        </usergroup>
    </usergroups>
    <hosts>
        <host id="1">computera</host>
        <host id="2">computerb</host>
    </hosts>
    <hostgroups>
        <hostgroup id="1">
              <name>ComputerGroup</name>
              <host id="1"/> <!-- computera --> 
              <host id="2"/> <!-- computerb -->
        </hostgroup>
    </hostgroups> 
    <ipranges>
        <iprange id="1" cidr="10.232.0.0/16">local10232</iprange>
        <iprange id="2" range="192.168.0.1-192.168.0.255">local1921680</iprange>
        <iprange id="3" cidr="127.0.0.1/32">localcomputer</iprange>
        <iprange id="4" cidr="fd00::/10">localipv6</iprange>
    </ipranges>    
    <iprangegroups>        
        <iprangegroup id="1">            
              <name>localgroupipv4</name>     
              <iprange id="1"/> <!-- local10232 -->
              <iprange id="2"/> <!-- local1921680 -->            
              <iprange id="3"/> <!-- localcomputer -->      
        </iprangegroup>
    </iprangegroups>  
      <editor name="Dassault Systemes">        
        <model type="NamedUser"> 
              <feature name="CPF">
                  <basicauthorizationlist ruletype="Deny">
                    <name>CPF</name> 
                    <user id="2"/> <!-- bob --> 
                  </basicauthorizationlist>            
              </feature>            
              <feature name="ENG">
                  <basicauthorizationlist ruletype="Allow">
                    <name>ENG</name>
                    <host id="1"/> <!-- computera -->
                  </basicauthorizationlist>
              </feature>
              <feature name="LIB">
                  <basicauthorizationlist ruletype="Reserve">
                    <name>LIB</name>
                    <usergroup quantity="2" id="1"/> <!-- UsrGroup1 -->
                  </basicauthorizationlist>
              </feature>
              <feature name="PRG">
                  <basicauthorizationlist ruletype="Limit">
                    <name>PRG</name>
                    <hostgroup quantity="1" id="1"/> <!-- ComputerGroup -->
                  </basicauthorizationlist>
              </feature>
              <feature name="IFW">
                  <offlinerestrictions>                    
                    <name>IFW</name>
                    <keyword>secret</keyword>
                    <maxduration>21</maxduration>
                    </offlinerestrictions>
              </feature>
          </model>
      </editor>
    </authorizations>
    Note: The <basicauthorizationlist> tag can appear directly under the <editor name> tag and not only under the <feature name> tag.

    For composite rules, the tag is <compositeauthorizationlist> instead of <basicauthorizationlist> for standard rules. For example:

    <compositeauthorizationlist>
        <name>MDG,5LBGS-SIEJ7-TVIF0-UFAMA-EU0WX,NamedUser</name>
        <user rule="Deny" id="1"/> <!-- anna -->
        <usergroup rule="Reserve" quantity="5" id="1"/> <!-- ug1 -->
        <usergroup rule="Reserve" quantity="10" id="2"/> <!-- ug2 -->
        <host rule="Limit" quantity="5" id="1"/> <!-- host1 -->
        <host rule="Limit" quantity="25" id="2"/> <!-- host2 -->
        <iprange rule="limit" quantity="50" id="1"/> <!-- ipr1 -->
    </compositeauthorizationlist>
    ...
    <basicauthorizationlist ruletype="Allow">
        <name>EDT,Token,5LBGS-SIEJ7-TVIF0-UFAMA-EU0WX</name>
        <user id="2"/> <!-- bob -->
    </basicauthorizationlist>
    

Import Authorization Rules

  1. Before importing authorization data, decide whether or not to remove the existing authorization data on your license server.

    Removing existing authorization data guarantees that the result will be exactly the content of the imported file. If you do not remove it, you will be prompted to merge manually the imported data with the existing data.

    Click the Reset button and click OK when prompted to remove existing data if required.

  2. To import authorization data, click the Import button and use the dialog box to select an XML file to import.

    If you removed existing authorization data from your license server, the imported data simply replaces it.

    For example, importing the example XML file above creates the following rules illustrated below:

  3. If required, edit the original XML file you imported.

    For example, declare new user Chuck, and remove the rule linked to the ENG license.

  4. Validate your XML file.

    Use your favorite XML tool to reference the following XSD file:

    DSLS_installpath\OS\resources\xsd\DSLSAuthorizations.xsd

    to parse the XML file and validate its structure and syntax.

  5. Re-import the file.

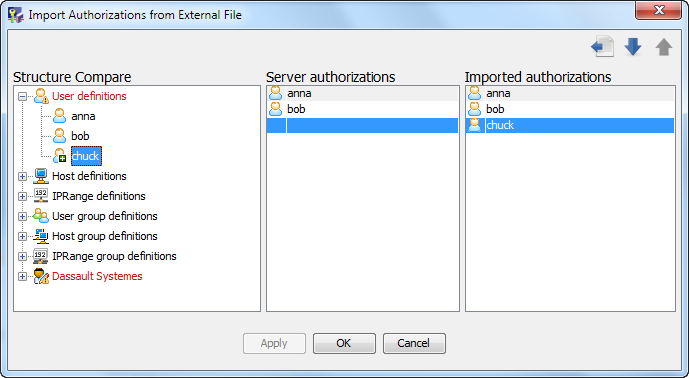
    This time, because you did not remove the existing authorization data from your license server, a dialog box will be displayed prompting you to merge the existing and imported data:

    Expand each highlighted node to see the full details:

  6. Resolve the merge.

    The role of each column is as follows:

    Structure Compare

    The Structure Compare column provides a synthetic view resulting from the comparison of the existing and imported data, in the following order:

    • user definitions
    • host definitions
    • IPRange definitions
    • user group definitions
    • host group definitions
    • IPRange group definitions.

    Note that:

    • a red item with a warning symbol indicates that something is different
    • a red item with a "+" symbol indicates that something has been added
    • a red item with a "-" symbol indicates that something has been removed.
    Server Authorizations
    The Server Authorizations column lists the existing server authorizations for each category.
    Imported Authorizations

    The Imported Authorizations column highlights in blue the imported authorizations.

    Navigate to the next or previous difference using the up and down arrows. Click the left arrow to accept the highlighted difference.

    In our example, the line "chuck" is highlighted in blue. It is highlighted because it is the first difference. Click the down arrow to navigate then, for example, to the rule linked to the ENG license (which has been has been removed), then to the other rules.

    In our example, user "chuck" is highlighted in the Structure Compare and Imported Authorizations column because it is the first difference detected. The "+" symbol on the rule chuck in the Structure Compare indicates that the definition has been added.

    To accept this first difference, click the left arrow: in this case, the user "chuck" is added to the Server Authorizations column, and the "+" symbol is removed.

    Click the down arrow to navigate to the next difference detected, and click the left arrow each time if you accept the new rule.

    All text in red becomes black once you accept the difference.

  7. Click Apply or OK to accept the changes.

    The updated data is then displayed in the Authorizations tab.

    In our example, the user "chuck" has been added, and the rule has been removed from ENG: