Tutorial: Implement Document Security

As already stated, Exalead CloudView queries a security source for:

  • Authentication: to verify the user's login and password

  • Authorization: to verify the security tokens for the user and the group to which the user belongs

This section will show how to configure user authentication only.

This task shows you how to:

Create the Security Source

  1. In the Administration Console, go to Search > Security Sources and click Add security source.
    1. For Name, type MySecurity.
    2. For Type, select Simple Security.
  2. For this security source, under Config > Users:
    1. Click Add item to add a new user.
    2. Specify user login information: Login: myuser, Password: myuser, Display name (the name that will be displayed when the user is authenticated): myuser
  3. Click Apply.
  4. Under Test user authentication:
    1. Click Test.
    2. Enter the user Login and Password, and click Test.

    If successful, your user ID, display name, and full list of security tokens (if any) displays.

    If not, check your parameters and contact your system administrator.


Enable Security in the Search Application

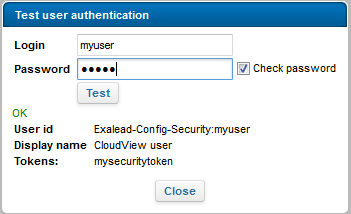
We now have a security source which can be queried to check logins. We now need to enable security in the UI, and tell it to use the security source we just created.

  1. In Mashup Builder, select Application from the top left menu bar.
  2. Under General > Security, click Add a security provider.
  3. In the Add security provider dialog box, select CloudView Security Provider and click OK.

    Note:

    A login page is created in your application.

  4. In the Source field, select the security source you created in the previous procedure, for example MySecurity.
  5. In the Mashup pages section, select the pages of your application on which you want to enable security. For example, the index and search pages.


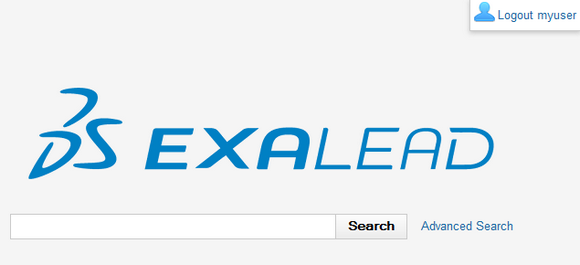
  6. For each page on which security is enabled, also add the Logout widget:
    1. Display the search page.
    2. In Widgets, search for ‘Logout’.
    3. Drag the Logout widget to the page.
    4. Repeat these steps for the index page.
  7. Click Apply to save the configuration changes.

Test Authentication

  1. Go to the Mashup UI.
    You are prompted to log in.
  2. Log in with the login/password defined previously (myuser).
    Once logged in, you can see the logout widget on the page (if you added the Logout widget).