Editing/Mapping Connection Point and Port

Before routing symbols, you can add connection point or graphical ports either from Functional & Logical Design or from Symbol Design.

  • In Functional & Logical Design: These commands are available in the Diagram section.
  • In Symbol Design: These commands are available in the Symbol Edition section.

This task shows you how to:

Edit Connection Point

The Modify Connection Point command lets you edit a connection point to modify its direction.

  1. Select a connection point.
    Arrows allowing you to select a direction and an anchor allowing you to fix the connection point are displayed.
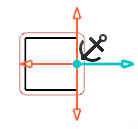
  2. Optional: To change the port direction, select another arrow.

    Note: You can also modify a connection point's direction by clicking on the context toolbar.

  3. To lock the connection point position, click Fix/Unfix Connection Point on the context toolbar.

    Note: Locking a connection point position can be done in Symbol Design, Functional & Logical Design.

    The connection point position is fixed and it cannot be moved unless you select Fix/Unfix the Connection Point again.

Map Connection Point with Port

The Port Mapping command lets you associate a stand-alone connection point with a port.

  1. In a diagram view, select a connection point.
  2. If needed, you can filter the ports:
    1. Hover the pointer over the column to be filtered and click .
    2. Enter one of the following criteria in the Display Name box:

      Note: You can also select the filter from the list. For each column, it references the five previously applied filters followed by all the available values.

    • To display only elements beginning with abc, enter abc*
    • To display only elements containing abc, enter *abc*.
    • To display only elements ending with abc, enter *abc.
  3. In the list, double-click a port.
    The port and the connection point are mapped.