Managing the Display of an RFLP Structure

You can manage the display of an RFLP structure to navigate through it.

This task shows you how to:

Expand/Expand All/Collapse

You can display or hide the content of RFLP categories.

Tip: See Customizing Preferences for more about controlling whether objects in your RFLP structure can be expanded or not.

  1. To expand the first level of an RFLP category, choose one of the following methods:
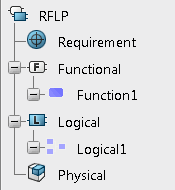
    • In the work area: double-click the category.

    • In the tree: double-click the category name.
    • In the tree: click the "+" on the left of the structure.
    The first level of the RFLP structure is expanded.

  2. To expand the entire RFLP structure in a RFLP category, click Expand in the Navigation section of the action bar.

    Tip: This command is also available from the context menu.

    The RFLP structure is fully expanded.

  3. To collapse an object, in the tree, click the "-" next to the structure node to be collapsed.
    The selected object is collapsed.

Refresh and Collapse

You can use the Refresh and Collapse 
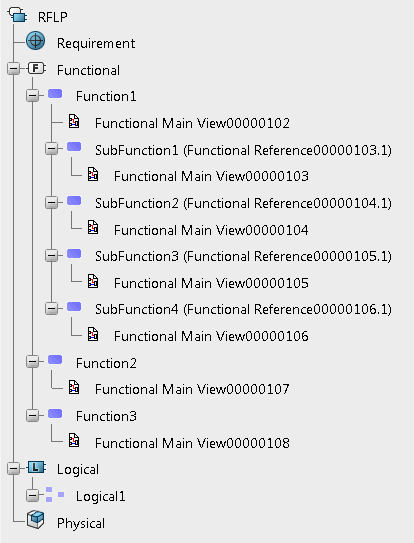
command to collapse the RFLP structure of a selected level and to refresh the structure content. This command can be used on multiple objects in the RFLP structure.

  1. Right-click an object.
  2. In the context menu, select Refresh and Collapse .
    The selected level is collapsed and its structure content is refreshed.

Select Under

The Select Under command lets you select all children under the selected object in the RFLP structure.

  1. In the tree or in the work area, select an object.
  2. From the Navigation section of the action bar, click Select Under .

    Tip: The command is also available from the context menu.

    The Select Under... dialog box appears.
  3. Define the criteria (if any) to be used for the selection using the Simple or Advanced tabs:
    • Simple tab (for a selection based on objects type): select an object type from the Object type list.
    • Advanced tab (for a selection based on type and attribute information):
      • Select an object from the Object type list.
      • Select an attribute from the Attribute type list.
      • Enter the value of an attribute in the Attribute Value box.
  4. Select the Keep current selection check box to keep these options next time you use the Select Under command.
  5. Click OK.

Display in 2D Graph

The Open 2D Graph command enables you to display the 2D graph view of a functional/logical structure.

  1. Select a function or a logical component.
  2. To activate the 2D graph navigation, click Open 2D Graph in the Navigation section of the action bar.
    The structure is displayed in the 2D graph.
    Important: The 2D graph view is read-only. You cannot move the objects nor edit your structure.
  3. To go down in the structure, double-click an object in the 2D graph.

    Note: If you select a product or a requirement, the 2D graph is hidden but the command remains activated.

  4. To go up in the structure, right-click an object in the 2D graph, and then select 2D Graph... > Go Up One Level.
  5. To deactivate the command, click Deactivate 2D Graph Navigation at the right top of the work area.

    Note: You can also deactivate the command by clicking Open 2D Graph .