Creating a Multiple View Projection

You can generate geometry in a view by projecting geometry from previously defined views.

Selected objects are projected onto a plane or a user defined ruled surface, and then transformed into the receiving view. Projected geometry retains the same attributes it had in the original multi-view.

This task shows you how to:


Before you begin:
  • By default, the Multiple View Projection command is not available in any of the action bars. To make it available, you need to customize the action bar. For more information, see Customizing an Action Bar by Adding Commands.
  • Create a drawing representation with front, right, top views containing geometry and an empty isometric view.
  • Double-click the view in which you want to create the geometry.
  • Make sure the planes are properly initialized.

Add Elements to an Existing View, Using the Action-Object Mode

You can add elements to an existing view using the action-object mode.

  1. From the customized section of the action bar, click Multiple View Projection .

    This command is not available by default. To add it to the action bar, select Me > Preferences > Customize > Commands, and drag and drop the command onto a section.

  2. Select the object defining the target plane or surface to be used.

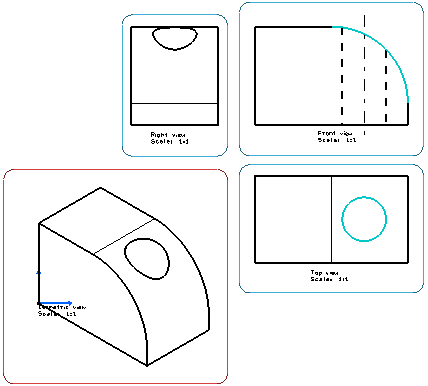
    This element can be any mono-parametered elements (line, circle, ellipse, parabola, hyperbola, or curve). For our scenario, select an arc of a circle in the front view.

  3. Select the object to be projected in another view.

    For our scenario, select the circle representing the hole in the top view.

  4. Select more elements to be projected, if needed, or click in the open space to end this command.

    In our example, the circle representing the hole is projected from the front and top views to the right view.


Create an Isometric View from Scratch, Using the Object-Action Mode

You can create an isometric view from scratch using the object-action mode.

  1. Double-click the isometric view to make it active.
  2. Select the elements to be projected into the isometric empty view.

    For our scenario, select the whole front view.

  3. Click Multiple View Projection .
  4. Select the object defining the view to be created.
    All the elements are automatically projected onto the active view.


  5. Repeat the above steps (Object-Action) with the various elements to be projected, to generate the isometric view.


Important: The projected elements keep the same graphical attributes as the selected element to be projected.