Creating a Helix | |||
| |||
-
From the Wireframe section of the
action bar, click
Helix
 .
.
- In the Type area, select the type of helix in the Helix Type list.
A helix is defined by three parameters: Pitch, Revolution, and Height. You can create a helix by any two parameters. Accordingly, you can select one of the following helix creation methods:
- Pitch and Revolution
- Height and Pitch
- Height and Revolution.
- Click the required pitch type: Constant Pitch or Variable Pitch.Note: The Variable Pitch is available only for the Pitch and Revolution type of helix.
- Set the helix parameters:
- Pitch: the distance between two revolutions of
the curve.Notes:
- The Pitch box is available only if you selected Constant Pitch above.
- The Pitch box is unavailable if you
selected Height and Revolution helix
type. In this case, the pitch is automatically computed
using the formula:
Pitch = Height / Revolutions
- You can define the evolution of the pitch along the helix using a law. For more information, refer to Creating Laws and About Swept Surfaces.
- Revolutions: number of turns of the helical
curve.Note: The Revolutions box is unavailable if you selected Height and Pitch helix type. In this case, revolutions are automatically computed using the formula:
Revolutions = Height / Pitch
- Height: the global height of the helical curve,
in a constant pitch type helix.Note: The Height box is available only for Height and Pitch and Height and Revolution helix types.
- Pitch: the distance between two revolutions of
the curve.
- In the Starting Point box, select a point.

- In the Axis box, select an axis.

-
Set the remaining helix parameters.
- Orientation: defines the rotation direction (clockwise or counter-clockwise).
- Starting Angle: defines where the helical curve starts, with respect to the starting point. This parameter can be specified for the Constant pitch only.
- In the Radius variation area, Taper Angle: defines the radius variation from one revolution to the other. It ranges from -90 deg to 90 deg, both extremes excluded. For a constant radius, set the taper angle to 0.
- Way: defines the taper angle orientation. Inward: the radius decreases Outward: the radius increases.
-
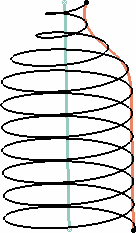
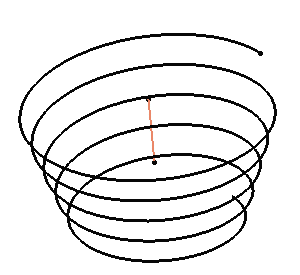
Profile: the curve used to control the helical curve radius variation. The radius evolves according to the distance between the axis and the selected profile (here the orange curve). Note that the Starting point must be on the profile.

- Click Reverse Direction to invert the curve direction.
- Click OK to create the helix.The helical curve (identified as Helix.xxx) is added to the tree.
