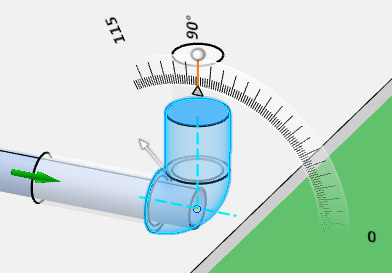
Modifying Bend Angle | |||
| |||
-
Double-click a route.
You switch to the HVAC 3D Part Design app and a yellow symbol appears on each node of the route.
- Click next to the bend you want to modify.The 3D Manipulator appears and the last active manipulator is displayed.
 Note: If the node is the last node of the route, the Length Manipulator is directly activated. You need to press the A key to switch to the Bend Manipulator.
 - In the Bend Manipulator panel, select the options and enter the values of your choice.
Option Description Angle Snap Step Graduation value displayed on the ruler Lock Direction  Lock Angle While Moving: the bend angle of the next node remains the same if the segments are co-planner.
 Unlock Angle While Moving: the bend angle of the next node is modified.
Use Selection Data  Do not get data from selection: the properties of the route remains the same.
 Get data from selection: the properties of the route are modified according to the properties of the selected port.
Selection Type  Pick Port from selection: the port routing is automatically launched.
 Pick Surface from selection: the routing on surface command is automatically launched.Note: This option is used when you select an item of equipment to route from port or along a surface due to the size of equipment.
Selection Mode  Automatically select nearest port: the nearest port is automatically selected.
 Select port manually: all the ports are displayed to let you choose the port of your choice from which you want to start routing.
Orthogonal Routing  Use orthogonal routing: alternate paths are displayed
 Do not use orthogonal routing: the created route is the shortest path
Context Mode  Launch Command: enables you to modify the route definition or to display the context toolbar, depending on the contextual selection:
- select a point, a port, or a support to modify the route definition. The selected object is added to the route definition.Note: Points must have been created beforehand. To create points, use the Point... command from the action bar.
- select a route segment to display the context toolbar and access commands.
 Modify Bend Angle: enables you to define a new direction for the bend manipulator depending on the contextual selection and the constraint plane that you define when you hover over the white dashed lines. The following contextual selections are available:
- 3D point: the bend manipulator is directed towards the projection of this 3D point on the constraint plane.
- line or route segment: the bend manipulator is directed towards the intersection of the line or segment with the constraint plane if any. If the line or segment is parallel to the constraint plane, then the bend manipulator is oriented in the same direction as this line or segment.
- plane: the bend manipulator is directed along the direction of the intersection of the selected plane and the constraint plane if any.
- select a point, a port, or a support to modify the route definition. The selected object is added to the route definition.
-
Click the bend manipulator and drag it to change the value of the bend angle.
You can also click the ruler value and enter a precise value.
Tip: To quickly access the ruler value, press the Space key, enter a value and press Enter. Note: If you want to change the direction of the bend, activate the Length Manipulator and move the mouse over the white dashed line of your choice. - Optional:
Drag the white arrow to modify the bend radius value.
Note: The white arrow is displayed only if the Allow local bend radius modification option is selected. If the Force usage from table option is also selected, green points are displayed to indicate the allowed bend radius values from the Turn Rule table. For more information, see Routing preferences.
- Optional: Click the bend manipulator or select an object to display the context toolbar with the available commands.