Creating 3D Curves | ||||||
|
| |||||
-
From the Curve section of
the action bar, click 3D Curve
 .
.
-
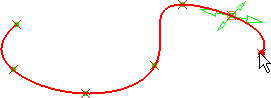
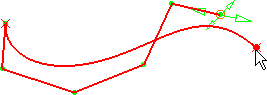
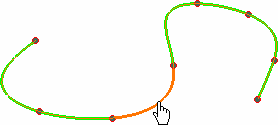
Select the curve creation type, then select the points.
- Through points: Creates a multiarc curve passing
through each selected point.
- Control points: Creates a curve with the selected
points as the control points.
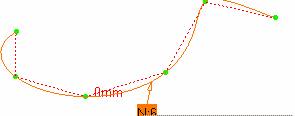
- Near points: Creates a single-arc curve with the specified order
and smoothed through the selected points.
- Through points: Creates a multiarc curve passing
through each selected point.
-
For the Control Points type, define the Max
Order allowing you to specify a bound for the computation of a
mono-arc curve.
When the Max order value is exceeded, the mono-arc curve becomes a multiarc curve. Consequently, the Max order value is no longer taken into account, as arcs have always 6 as their order.
Note: The minimum value for the Max order option is 5. If the Order value defined in Me > Preferences > App Preferences > 3D Modeling > Styling
> FreeStyle Shape Design,
General
tab, Geometry
section, is 5, for Control Points, the
Max order value is 6 (minimum and maximum bounds
must be different). The maximum value for the Max
order is the same as that one defined in the preferences . If you decrease
the value in the preferences and it is lower than the
Max order value, the latter value
prevails.
> Preferences > App Preferences > 3D Modeling > Styling
> FreeStyle Shape Design,
General
tab, Geometry
section, is 5, for Control Points, the
Max order value is 6 (minimum and maximum bounds
must be different). The maximum value for the Max
order is the same as that one defined in the preferences . If you decrease
the value in the preferences and it is lower than the
Max order value, the latter value
prevails. - Optional:
For the Near Points type, specify the smoothing options
to parameterize the curve.
- Chord Length (default): Smoothing parameter =
0
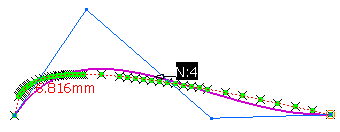
- Uniform: Smoothing parameter = 0
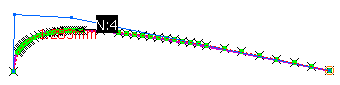
- Smoothing parameter: Enables a better control
point distribution of the smoothed curve.
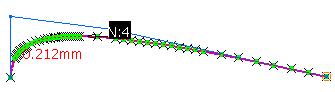
Smoothing parameter = 50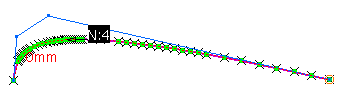
Smoothing parameter = 130
- Chord Length (default): Smoothing parameter =
0
- Optional: Insert a control point:
-
Ctrl+A or click Insert a point
 .
.
-
Click the segment between two existing points where you want to add a
new control point.
-
Click at the position where you want to add the control point.
The new control point is added.
You can now continue to edit the curve.
-
Ctrl+A or click Insert a point
- Optional:
Click Remove a point
 and
select a point.
and
select a point.

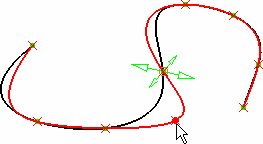
- Optional:
Click Free or constrain a point
 and select
the point.
and select
the point.
- Constrain a 3D point: Move the cursor close to a point or a wire to
which you want to link it. Move the cursor over a geometric element and do
one of the following:
- Move the point to the indicated point by clicking.
- Press+hold+Ctrl to project this point onto this element according to the shortest distance from the point's initial location.
- Free a point that is lying on another point or curve: Move the point by
the handles to any new location.

Note: You can snap a point onto a surface using the Free or constrain a point option. The point is lying to the surface, but not constrained. - Constrain a 3D point: Move the cursor close to a point or a wire to
which you want to link it. Move the cursor over a geometric element and do
one of the following:
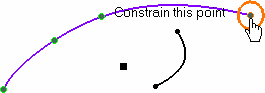
- Optional:
Ctrl+T or click Insert a point in tangency
 , then select the position where you want to insert the
point.
The new point is inserted on the line passing through the two last control points.
, then select the position where you want to insert the
point.
The new point is inserted on the line passing through the two last control points.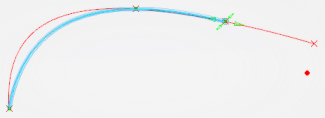
It is at the minimum distance of the cursor, here the red dot. The new point is created at the red cross.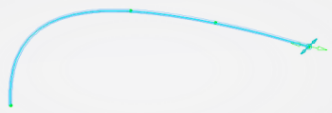
After adding the point, the tangent mode is automatically deactivated. You can use Ctrl+T to reactivate this option.
- Click OK to create the curve.
Note:
You can edit a 3D curve afterwards by a double-click that opens the 3D Curve command. You can also use the Control Points command offering more options for moving the control points:
- Select the curve.
- From the Edition
section of the action bar, click Control Points
 .
. -
In the appearing message, click Yes to edit the 3D curve.
Click No to create a new curve feature with the 3D curve as a reference.