Defining Manipulation Laws | |||
| |||
-
From the Shape Sculpt section of the action bar, click Modification
 .
.
-
From the Tools Palette, click Law Manipulation On/Off
 .
.
This function is available with all types of Translation, and Affinity commands.
A law manipulator appears to let you define and manage the manipulation laws. You can define your own laws or choose a predefined law.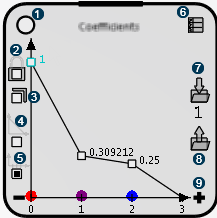
Option Description 
Moves the graphic manipulator in the work area. 
Locks free edges. 
Locks sharp edges. 
Shows predefined laws (linear, concave, or convex). 
Defines the number of coefficients that propagate the law. If it is deactivated, the law automatically propagates to the free edges. 
Opens a dialog box to enter coefficients manually. 
Saves the law. 
Stocks all the saved laws and enables to choose one of them using the left and right arrows or delete one. 
Adds a coefficient (+ sign) or removes a coefficient (- sign). Notes:- You can change the size of the law manipulator with the resizing handle at the top.
- You can give a color to each summit.
- You can also manipulate the square cursors on the law to modify the coefficients manually. The distance between points is taken into account.
- The laws you create are automatically named and ordered by number.
- The number of coefficient is limited to 10.
-
After you define a law, select a surface and drag the pointer.
Only the selected elements move.
Without a law 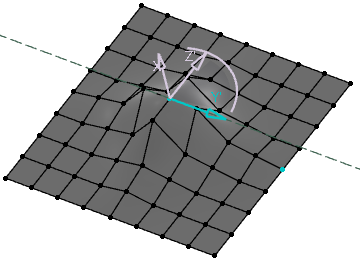
With a law 
The surrounding elements of the selected surface move according to the coefficients defined by the law.