Animating Using 3D Handles | |||
| |||
-
From the Mechanical Systems Design section of the action bar, click Mechanism Player
 in the action bar.
The Mechanism Player appears.
in the action bar.
The Mechanism Player appears. -
Move the pointer on a product in the 3D.
A handle—also referred to as a ruler is displayed in the 3D for each command in the mechanism.
The ruler type is command–dependent. The ruler displayed is the nearest to the pointer that can be used.
Important: If a joint has commands assigned to it and involve multiple degrees of freedom (DOFs), then only one command-ruler is displayed at a time. The other DOF values for the joint are displayed but cannot be directly manipulated; this rule applies to cylindrical and screw joints. 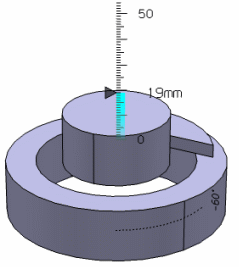
Consider the above example, the command is assigned to a cylindrical joint; both angle and length DOFs can be controlled. In this case, as you move the pointer, the length-ruler along with the current command value appear (marked by the arrow). The angle value is also displayed. If the angle-ruler appears instead, the length value is displayed.
For more information, see About Engineering Connections.