-
For best results:
-
Create a mass with multiple stories,
-
Activate the story where the elevator shaft is to begin using one of the following
methods:
- In the tree, double-click Shell and
Core.
- From the Building section of the action bar, click Activate Story
 .
.
- Press Ctrl and from the 3D area, click the lowest story that the elevator is to
serve.
-
To sketch an elevator shaft
- From the Building section of the action bar, click Positioned Sketch
 .
.Note:
You can create a sketch using Sketcher.
- In the 3D area, sketch the elevator shaft.
- In the Sketcher app, in the Sketch section of the action bar, click Exit App
 .
.
-
From the Building section, click Elevator
 .
.
- From the Elevator dialog box, click Profile
 .
. -
In the 3D area, click the sketch of the elevator.
-
From the elevator shaft in the 3D area:
-
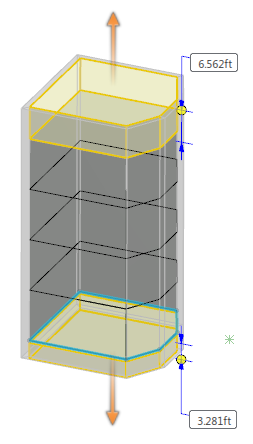
To adjust the clear overhead space above the elevator shaft, drag the
Above Height handle to the desired height.
-
To adjust the depth of the elevator pit, drag the Pit Depth
handle to the desired depth.
Alternatively, use the value boxes to change the values.

-
To remove walls from the elevator, from the Elevator Shaft dialog box, click Remove Walls
 .
.
Remove Walls is a toggle. The toggle is
highlighted when the elevator shaft walls are removed.
-
To change the number of stories in the elevator shaft, from the Elevator dialog box in Number of stories, enter or select your entry.
- To change the elevation for the bottom of the elevator shaft, in Starting Story, select a story.
- In Extend Downward, enter the distance by which the walls of the elevator extend downward beyond the bottom of the primary slab of the starting story.
-
Click
 .
.
In the tree, the system lists the elevator shaft in Shell
and Core. To see the listing, expand Building,
Spaces and Mass. The elevator pit has the same
thickness as the default primary slab thickness. To change the pit slab thickness, use the
Slab Thickness command, which is available from the context toolbar.
 .
.