Creating a Table

Table lets you create a table to capture the drawing information in a tabular form using the pointer, with or without selecting a reference.

This task shows you how to:


Before you begin: Open a layout representation.

Create a Table Using the Pointer

  1. Click in the sheet to indicate the table anchor point.
  2. Move the pointer in the required direction to decide the table orientation.

    At the same time, a dialog box appears at the top, displaying the number of columns and rows of the previewed table.
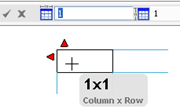


  3. Optional: Select one of the red handles to invert the orientation of the table in the corresponding direction.
  4. Move the pointer till you get the required number of rows or columns.
  5. Click in the sheet.
    The table is created.

Create a Table Using a Reference

Before you begin: Create a line.
  1. Select the line to indicate the table anchor point.
  2. Move the pointer in the required direction to decide the table orientation.
  3. Optional: Select one of the red handles to invert the orientation of the table in the corresponding direction.
  4. Optional: Use the context toolbar commands to change the table creation mode.
  5. Move the pointer till you get the required number of rows or columns or enter the values in the dialog box.
  6. Click in the sheet.
    The table is created.

Insert an Attribute Link in a Table Cell

  1. Create a table using the pointer or by selecting a reference.
  2. Double-click the table to switch it to the edition mode.
  3. Right-click a table cell and select Insert > Insert Attribute Link.
  4. In the Insert Attribute Link dialog box, select the object to which you want the text to be linked .
  5. Select the attribute and click OK.

    An attribute link is created.