-
From the action bar, select Band
Analysis

-
In the Band Analysis panel, select the desired mode of
measurement. For example, Chain Measure
 . .
 By default, Single Measure is selected. By default, Single Measure is selected.
-
In the Calculation Mode box, select
Approximate.
Note:
The other calculation modes are not taken into account.
-
Enter the desired values in the Minimum distance and
Maximum distance boxes to define the bandwidth.
- Optional: Enter a value in the Accuracy box.
A lower accuracy value provides more accurate result, but the computation time is higher. -
Select the first object.
-
Select the second object.
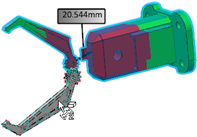
The band analysis is performed and the minimum distance result is displayed in the 3D area. - The green surfaces identify the areas where the minimum distance between the products is within the specified range.
- Red surfaces identify the areas where the minimum distance between the products is less than the specified minimum distance.

- Click Validate the Measure
 on the context toolbar. on the context toolbar.
|