- From the Review section of the action bar, click Sectioning
 . .A number of elements are available to define the section:
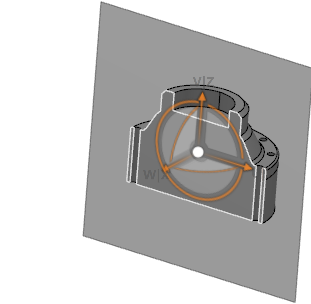
- A plane appears at the center of the bounding box of
the cut elements.
By default, it cuts the geometry completely, however you can also resize and move it manually.

- Translation handles enable you to translate the
plane.
- The Robot snapped at the center of the plane enables
you to rotate and translate the plane in the X, Y and Z
directions.
- You can use the rulers to set the precise location for the section plane during translate and rotational movements. The rulers appear when you move the plane. You can specify the value for positioning the plane.
- A context toolbar is available to customize the
section visualization.
- An Opacity slider is also available to modify the opacity of the products to analyze the section result more clearly and easily.
Note:
For a better rendering, use the Shading (SHD) or Shading with Material.
- The information consisting of section name, section plane center co-ordinates, width and height of the section plane, offset in case of slice and box mode appears in the 3D area.
Notes:
- If you do not want to select the whole product, you can select
objects or modify the selection using the
Ctrl
key directly in the scene or in the tree. You can do
it before or during the sectioning.
- You can select an existing persistent measure between feature in the tree or in the 3D area before clicking the Sectioning command. The section plane is created such that it is parallel to the direction of the measure dimension line and its center is placed at the midpoint of the measure dimension line. The axes of the section plane are as below:
- The u-axis is along the component directions of the measure dimension line.
- The w-axis is a cross product of the u-axis and the z-axis of the principle axis system.
- The v-axis is a cross product of the u and w axes.
- Move the section plane to define your section cut.
To move the section plane,
you can use: - The handle, that is the arrow symbol which, as you move it either forward or backward, results in the section plane cutting the geometry.
- The Robot.
- On the context toolbar, customize the section visualization.
- Click Display the contour and the grid of the section
 . .The grid is displayed. - Click Change the grid lines style as Lines or Cross
 . .The grid style is changed from lines to cross. - Click Edit the number of lines of the grid
 to edit the U and V spacings of the grid. to edit the U and V spacings of the grid.You can select the Automatic Filtering check box to automatically adjust the grid lines, when you perform a zoom in or a zoom out in Secondary Viewer.
- To position the section plane, click one of the following on the context toolbar,
- Click Switch between Auto Update, Manual Update and Freeze Mode
 on the context toolbar. Depending on whether the section is to be updated automatically or manually, or kept as it is, click any of the following: on the context toolbar. Depending on whether the section is to be updated automatically or manually, or kept as it is, click any of the following:- Switch to Auto Update Mode
 - Switch to Manual Update Mode
 - Switch to Freeze Mode

- On the context toolbar, click Validate the Section
 . .The section is created and listed as Section.x under the Notes node in the tree. - Optional: Click Sectioning
 again. again.The section plane appears. Note:
The default section plane position depends on the viewpoint.
- To edit an existing section, do either of the following:
- Double-click the section in the tree or the plane
contours in the geometry.
- Right-click the Section.x in the tree or the section plane contours
in the geometry, and select
[section_name]object > Definition.
- Optional: To select a predefined plane during the section creation, click Select Predefined Plane
 on the context toolbar. on the context toolbar.The Select Predefined Plane dialog box appears. - Optional: In the dialog box,
- In the System list, select the required plane system.
- In the Plane list, select the required plane.
- In the Offset list, select the required offset plane.
Note:
Offset list appears, only if you select Display a slice or Display a box option on the context toolbar.
- Click OK.
Note:
When you create a section using predefined plane option, the name of the section plane is visible instead of the section name in the work area.
|