Create a 2D Shape Marker
You can create 2D shape markers such as arrows, circles, rectangles, freehand
curves, and splines.
You can create the following markers:
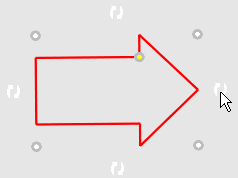
- 2D Surfacic Arrow.
- 2D Surfacic Left Right Bent Up Arrow .
- 2D Surfacic Bent Up Arrow.
- 2D Surfacic Left Right Arrow.
- 2D Line.
- 2D Arrow.
- 2D Left Right Arrow.
- 2D Circle.
- 2D Fun Circle.
- 2D Fun Rectangle.
- 2D Fun Freehand.
- 2D Spline
- 2D Freehand.
- 2D Rectangle.
Before you begin: Open an existing 2D review.
-
From the Review section of the action bar,
click the required marker, for example 2D Fun Circle
 . .
-
Click in the 3D area where
you want to place the marker and drag.
The marker is created.
For more information about marker context toolbars, see
Marker Context Toolbars.
Notes:
You can:
- Use handles to modify the shape of the marker.
- Select and drag the marker to change its position.
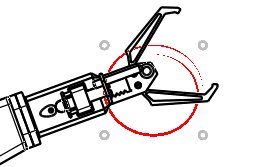
- Use the Robot to change the position of the marker.
- Rotate some of the markers such as 2D Surfacic Arrow
using handles.
- Customize the graphical properties of the marker.For
more information, see Marker Context Toolbars.
Create a 2D Text Marker
You can create a 2D text marker.
Before you begin: Open an existing 2D review.
-
From the Review section of the action bar,
click 2D Text.
-
Click in the 3D area where
you want to place the marker.
A context toolbar appears.
-
Select the text marker type and text template to configure the text marker.
Note:
Depending on the marker type associated with the text template, the text template
options are available in the text template list. For more
information, see Text Marker Context Toolbars.
-
Enter the required text in the text editor box and click OK
 . .
The text marker is created.
- Optional:
To rotate the text marker,
-
Drag the Robot and drop it onto the center of the marker.
-
Rotate the handle of the Robot to rotate the marker.
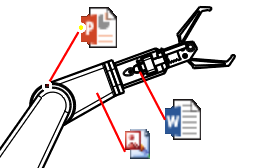
Create a 2D Picture Marker
You can create 2D picture markers.
Before you begin:
- Activate a markup.
- Specify the document management preference for picture markers. For more information, see General.
-
Create a 2D picture marker using any of the following methods:
| Creation Method |
Inputs |
Marker Position |
| Drag and drop |
- Drag the image files from your local computer, press
Shift, and drop them in the 3D area.
- Drag the picture documents from 3DSearch, bookmarks, or library browser, press
Shift, and drop them in the 3D area.
|
The markers are created with their leaders pointing the drop location.
One marker is created per image. |
Using the 2D Picture
 command.
 |
- Click 2D Picture
. The
3DSearch panel lists all the documents containing
the .tiff, .tif, .jpg, .jpeg, .bmp, .png, and .svg files, available on the
3DEXPERIENCE platform.
- Search and select your image document. You can also select the document
from the Bookmark
app.
|
Specify the marker position using either of the following methods:
- Click in the 3D area.
- Click and drag to specify the leader start point and the marker's
upper-left corner.

|
| Using an image from the clipboard. |
- Copy an image.
- Do any of the following:
- From the action bar, click Paste from Clipboard
 . .
- Right-click the active markup and select Paste from
Clipboard
.
|
Press Shift and specify the marker position using
either of the following methods:
- Click in the 3D area.
- Click and drag to specify the leader start point and the marker's
upper-left corner.
|
- Optional:
Modify the size, shape, and position of the marker as required.
Create a 2D Hyperlink Marker
You can create hyperlink markers.
Before you begin:
- Open an existing 2D review.
- Specify the document management preference for hyperlink markers. For more information, see General.
-
From the Review section of the action bar,
click 2D Hyperlink
 . .
-
Click in the 3D area where
you want to place the marker.
The Hyperlink Panel dialog box appears.
-
To create a web link, enter a web address in the box and click OK for Text
link Mode
.
-
To create a link to a document, select an import type.
- Import Image as Link: saves the document as a
link.
- Import Image as DOC and save it.: imports the document in
DOC format and saves it.
-
Do any one of the following actions to select a document.
- Select a document from the Standard Docs tab.
- Select a document from your computer.
- Click Browse Image.
- Select the required document and click Open.
The
selected document appears in the Import Document
tab.
- Click the imported document.
- Enter the required string in the Search
 box in the top bar, press Enter, and select the required document from the
displayed results.
box in the top bar, press Enter, and select the required document from the
displayed results.
The hyperlink marker is created.
Notes:
- You can create hyperlinks to the following documents.
- Image files: .bmp, .png, .tiff, and .rgb
- Other files: .doc, .docx, .xls, .pdf, svg, and .zip
- To open the document, right-click the required marker and select .
- You can select the hyperlink marker icon depending on the type of link
associated with the marker. See Hyperlink Marker Properties Context Toolbar
- If the link between a marker and a document is broken, it is represented as
 in place of
the marker. in place of
the marker.
Create a 2D Audio Marker
You can create audio markers.
Before you begin: Open an existing 2D review.
- Open an existing 2D review.
- Specify the document management preference for audio markers. For more information, see General.
-
From the Review section of the action bar,
click 2D Audio
 . .
-
Click in the 3D area where
you want to place the marker.
The Audio Panel appears.
-
Record a new audio or select an import type.
To record a new audio, click  .
-
Select an audio file in .wav format.
The audio marker is created. Note:
For the 2D markers created on 3D geometry, the
size and the position of the 2D markers are based on the height of the viewer. If you
modify the width of the viewer, the size and the position of the markers do not change.
|
