From the Idealize section of the action bar, click
Split.
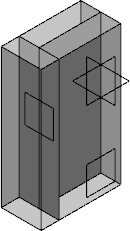
Click the
Splitting Element box from the
Split.x dialog box and
select a plane, a face or a surface.
An arrow appears indicating the portion of body that will be retained.
Only the intersected portion of the body will be split.
Notes:
You can select the arrow to reverse the direction for the portion of
the body to be retained.
Using input elements that are tangent to
each other may result in geometric instabilities in the tangency
zone.
Select the Partitioning check box.
This option creates inner faces in the body. The resulting non-manifold
geometry consists of several volumes.
Select the required body as Volume to disconnect.
Click
OK.
Material is removed. Only one pad is split as the surface splits the 3D
representation when they intersect it. Split.x node is
added to the tree.
If you have selected the
Partitioning check box, internal faces are
created. The geometry is partitioned into several volumes. Each partitioned
volume is now treated separately. Volume with Partitioning: consists of
inner faces
Note:
The Split command simplifies
the geometry containing joined faces that have the same planar or surface
support are merged.
 .
.