-
In the
Profile box, select
Sketch.2 to define the profile you want to
sweep.
-
In the Center curve box, select the center curve sketch
feature.
-
From the
Type list under
Profile control, select the appropriate option
(in this case,
Keep angle).
-
Click
OK.
-
Delete this rib to create another one by using
Pulling direction. After selecting this
option, select plane xy to define z axis as the pulling direction.
-
Delete this rib to create another rib by using
Reference surface. First, display the
multi-sections surface in the Show space, then set
Reference surface
and select the multi-sections as the reference surface.
The angle value between the h axis of the profile and the surface equals 0. It
remains constant.
-
Click
 option to add thickness to both sides of the sketch. option to add thickness to both sides of the sketch.
-
In the
Thickness1 and
Thickness2 boxes, enter the thickness values
and preview the result.
-
To add material equally to both sides of the profile, select the
Neutral fiber check box and preview the
result.
-
Click OK to create the rib.
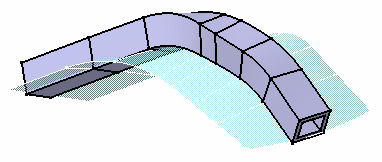
The rib looks like this:

|
 option to add thickness to both sides of the sketch.
