Two Ways of Sewing
This section provides you different ways of sewing operations.
Depending on geometry, two kinds of sewing operations can be performed:
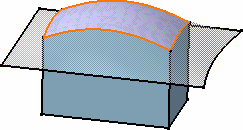
- If the surface is designed so that its boundary entirely lays on
the solid, you can sew it using the surface boundary projection onto the solid.
You can also use the
Simplify Geometry option. Sewing
features (in boundary projection mode) is more
productive (CPU cost) and stable (geometric tangency condition) than creating a
solid using
Close Surface
 (when possible) as no surface/surface intersections are
computed.
(when possible) as no surface/surface intersections are
computed.
- If the surface crosses the solid, you can make the app compute the intersection of the surface with the solid before sewing the surface. In this case, you need to use Intersect body.
More About the Simplify Geometry Option
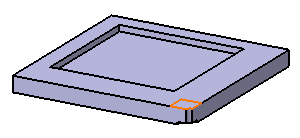
Some operations performed after sewing using Simplify geometry may make the simplified geometrical result disappear. As shown in the example below, filleting an edge belonging to a sewn surface makes the sewn geometry disappear.

More About the "Intersect body" Option
You can use this option when the surface straightly crosses the solid without being tangent. The app then needs to compute the intersection between the surface and the solid, the portions of surface with "free edges" being eventually removed.
Note that Intersect
body should not be used in case of solids having
through
holes or
pockets and where it is not possible for surface to
add material for sew operation.
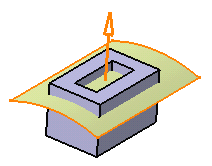
In the following example, the
app
can compute the intersection:

| Tip: If you select the Intersect body check box in the Sew Surface.x dialog box, Simplify geometry check box is also get selected automatically. |
The arrow indicates the portion of material that will be kept:

The surface is sewn onto the body. Some material has been
removed.