-
From the Model or the Essentials
section of the action bar, click Thick
Surface
 . .
The Thick Surface.xdialog box appears.
-
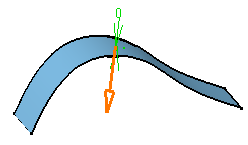
Select the element you want to thicken, that is the extrude element.
-
In the 3D area, the arrows that appear on the extrude element indicate the first offset
directions. If you need to reverse a direction, click the corresponding
arrow.
- Optional:
Enter the first and second offset values in the First
offset and the Second offset boxes
respectively.
Note:
These values will be applied to the entire selected object.
- Optional:
Select sub-elements to be thicken in the work area and click
 in the
Sub-elements box. in the
Sub-elements box.
A table containing sub-elements appears.
- Optional:
Select the faces to apply the thicknesses and enter the respective
First Offset and Second Offset
values and click
 in the
Sub-elements box. in the
Sub-elements box.
- Optional:
Select the Propagate faces to thick
 to
apply the thickness to the faces tangent to the selected face. to
apply the thickness to the faces tangent to the selected face.
-
Select the
Smoothing mode from the following types:
-
None:
No smoothing is applied. This is the default option. The Max deviation box is unavailable.
-
Manual:
Smoothing is applied as per the maximum deviation. The default value is 0.1
mm.
-
Automatic:
Smoothing is applied automatically.
Note:
You can select the Disable Tangency
Continuity check box to avoid tangency continuity on the
lateral edges.
- Optional: Select one of the Regularization types on the offset surface:
- Local: regularizes the offset surface locally to minimize the deviation.
This option improves the number of successful computations by adding local adaptations to the offset body. As a result, new internal faces, edges or vertices may be created. However, as the distortion is local, deviation area is restrained and the deviation is lower. - Global: regularizes the offset surface completely. If the local regularization fails, an informative prompt is displayed and the offset surface is globally regularized.
-
Click
OK.
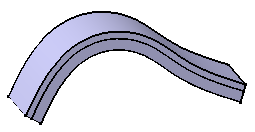
The surface is thickened. The tree is updated.
Note:
The resulting feature does not keep the color of the
original surface.
|