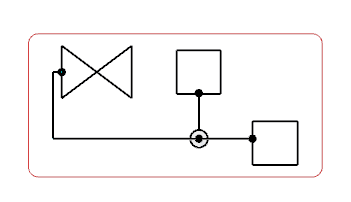
Branching a Pipe

You can branch a pipe on an existing route in the diagram view.

Important:

Branching a pipe splits the existing pipe and create a piping branch.


Before you begin: Open an existing diagram view containing:
  • A logical reference under the Logical node
  • A pipe reference under the Logical node
  • An existing pipe route between two components
  • A component to branch.

In the Data Setup app, define a default symbol for the branch component.


  1. In the tree, right-click the logical reference and select Insert Existing Logical Component.
    The Select an existing logical component dialog box appears.
  2. Click From Session tab, and click Retrieve Loaded Data.
  3. Select the pipe reference in the list.

    Important: You can select a pipe reference from a catalog, or in session.

  4. Click OK to close the Select an existing Logical component dialog box.
    The Route Command dialog box appears.
  5. Select the existing pipe.

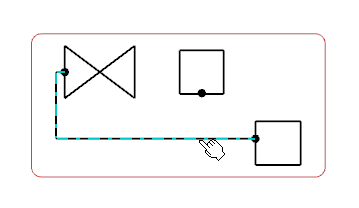
    The pointer changes into a hand when a pipe is selected:
  6. Select the component you want to branch.

    A context toolbar appears, containing commands to create an elbow or a straight route.

    Your pointer turns to a hand when a port is selected:

    Important:
    • Ports on a component can have a visible representation or not.
    • If no existing port is selected, a new one is created.

    The pipe route is branched. The branch symbol you defined in the Data Setup app is placed in the diagram view.