Defining Symmetry | ||||
| ||||
-
From the Reconstruction section of the action bar, click Symmetry Creation
 .
.
-
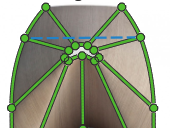
Click two points to be defined as symmetrical.
A blue dotted line appears between the selected points and indicates symmetry.
 Note: You can change color of the constraint using the Constraint color option from the Display Constraint section in Me
 > Preferences > App Preferences > 3D Modeling
. For more information, see Native Apps Preferences
Guide: General.
> Preferences > App Preferences > 3D Modeling
. For more information, see Native Apps Preferences
Guide: General. -
To define other symmetries, repeat Step 1 and do one of the following actions:
- Select two points to define a new symmetry (Step 2).
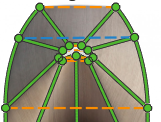
- Click an orange dotted line to validate a suggested symmetry. Note: Possible symmetries appear when clicking Symmetry Creation a second time, after the definition of a
first symmetry. The suggested symmetries are displayed as orange dotted
lines.
- Press Enter to validate all the suggested symmetries.
The following example shows you
how to define symmetries between points: