Source
The light source parameters help you define some light parameters.
Type
Three types are available in the Type list and have specific parameters.
For more information about light types, see About Creating a Light.
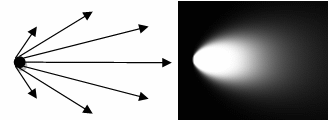
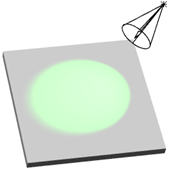
Spot
When you select the Spot type, the light is emitted in a specified direction with a certain spreading
The following parameters are available for nonphysical lights:
| Parameter | Description | |
|---|---|---|
| Angle |
Enables you to define the half-angle of the cone, that is the angle between the axis of revolution and the cone edge (for spot light sources only). The angle is a value between 0 and 90 degrees. This means that a value of 90 degrees would generate a light source equivalent to a punctual light source.  |
|
| Color | Sets a color for the light spread. | |
| Intensity | Defines the light intensity using the slider or by
entering a value directly in the box. The intensity of a light source is the maximal lightness value of three colors (ambient, diffuse, and specular). The light color is computed by multiplying the Red, Green, and Blue values you defined in the previous step by the intensity value. Therefore, this parameter allows you to adjust the luminosity of the light source, while preserving its chrominance ("color") component. You can enter values comprised between 0 and 1: the higher the value, the more saturated (that is, the whiter) the light. More precisely, as soon as the intensity value exceeds 1, the color starts saturating. For examples comparing 2 different sets of RGB values with 3 different intensities, see Color Model. |
|
| Falloff |
|
|
| End |
Defines in millimeters the maximum distance for light attenuation (that is, the
distance to the center from which the light source does
not illuminate). |
|
| Start Ratio |
Defines as a ratio the minimum distance for light attenuation. For example:
|
|
| Angle Ratio |
Defines as a fraction of the light angle the angle to the light axis from which the light starts to attenuate. For example:
|
|
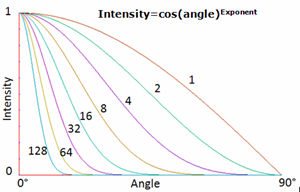
| Exponent |
Simulates the angular attenuation of a spot light intensity from the inner
cone to the external cone. By this it means, the exponent parameter controls the
slope of the intensity angular attenuation between the external cone defined by the
spot angle and the inner cone defined by the angle ratio according to the following
formula: cos(angle)Exponent. Its value range is [0-128]. |


The following parameters are available for physical lights:
| Parameter | Description |
|---|---|
| Angle |
Enables you to define the half-angle of the cone, that is the angle between the axis of revolution and the cone edge (for spot light sources only). The angle is a value between 0 and 90 degrees. This means that a value of 90 degrees would generate a light source equivalent to a punctual light source. |
| Color Model |
Lets you choose between:
|
| Multiplier | Specifies a multiplier coefficient. |
| Color | Specifies a color for the light spread. |
| Temperature | Describes the light as a temperature. Drag the slider, or enter the appropriate value in the box. You can specify the color temperature of the light in Kelvin (K) to compute the light color. |
| Intensity Unit | Specifies the unit for light intensity. You can choose between Candela (cd unit) or Lumen (lm unit). |
| Luminous Intensity | Specifies the intensity of the light in candela or in lumen. |
| Angular Attenuation | For physical lights. |


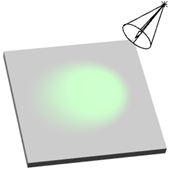
Point
When you click the Point type, the light is emitted with the same intensity in every direction.

The following parameters are available for nonphysical lights:
| Parameter | Description |
|---|---|
| Color | Sets a color for the light spread. |
| Intensity | Defines the light intensity using the slider or by
entering a value directly in the box. The intensity of a light source is the maximal lightness value of three colors (ambient, diffuse, and specular). The light color is computed by multiplying the Red, Green, and Blue values you defined in the previous step by the intensity value. Therefore, this parameter allows you to adjust the luminosity of the light source, while preserving its chrominance ("color") component. You can enter values comprised between 0 and 1: the higher the value, the more saturated (that is, the whiter) the light. More precisely, as soon as the intensity value exceeds 1, the color starts saturating. For examples comparing 2 different sets of RGB values with 3 different intensities, see Color Model. |
| Falloff |
|
| End |
Defines in millimeters the maximum distance for light attenuation (that is, the
distance to the center from which the light source does
not illuminate). |
| Start Ratio |
Defines as a ratio the minimum distance for light attenuation. For example:
|
The following parameters are available for physical lights:
| Parameter | Description |
|---|---|
| Color Model |
Lets you choose between:
|
| Multiplier | Sets a multiplier coefficient. |
| Color | Sets a color for the light spread. |
| Temperature | Describes the light as a temperature. Drag the slider, or enter the appropriate value in the box. You can select the color temperature of the light in Kelvin (K) to compute the light color. |
| Intensity Unit | Sets the unit for light intensity. You can choose between Candela (cd unit) orLumen (lm unit). |
| Luminous Intensity | Sets the intensity of the light in candela or in lumen. |
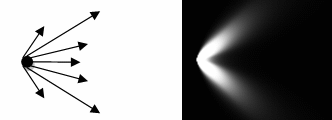
Photometric
When you select the Photometric type, the light intensity is measured according to the light direction and it is stored by the manufacturer in an IES file or a EULUMDAT file.
The following parameters are available for photometric lights:
| Parameter | Description |
|---|---|
| Color | Sets a color for the light spread. |
| Light Profile | Defines the light profile. Click A preview of the light profile is displayed. It corresponds to a light representation that matches with the characteristics contained in the IES file attached. |
| Luminous Intensity | Sets the intensity of the light in candela or in lumen. |
| Intensity Unit | Sets the unit for light intensity. You can choose between Candela (cd unit) or Lumen (lm unit). |
Color Model
Two colors models are available: RGB and Temperature. If you select the Sun type, this parameter is not available.
RGB Color
Light is associated with an RGB color value that does not involve wavelengths or spectral rendering.
The light color is computed by multiplying the Red, Green, and Blue values by the intensity
value. Therefore, this parameter adjusts the luminosity of the light and
preserves its chrominance component. The default color is white.
- (1) Add to Favorites
- (2) Color comparator
- (3) Main component selector
- (4) Color selector
- (5) Main component slider
- (6) Color component values
Use the slider to modify the color intensity, or click  to
choose another color in the Color dialog box. Three
tabs are available:
to
choose another color in the Color dialog box. Three
tabs are available:
- Definition lets you enter a value comprised between 0 and 255 for
any of these boxes.
The overall color of a light source is composed of three independent colors: diffuse, ambient, and specular. The values of these colors are given in RGB mode or in HLS mode by three real positive values:
- HSL (Hue, Saturation, Luminance)
model is an intuitive, easy to use tool for describing or
modifying a color.
Hue is the "color" of the color. It is the name by which the color is designated and is used to define the required color.
Saturation is the intensity of the color. The higher the number, the more intense the color.
It is used to tune the purity of the color.
Luminance is the brightness of the color, that is, the degree to which the pure color is diluted by white or black. The larger the number, the lighter the color. It is used to adjust intensity.
- RGB (Red, Green, Blue) model is a more physical model. It is based on the tri-stimulus theory of the human perception system. This model is usually used to define, with a high precision, the three primary components of the color.
- HSL (Hue, Saturation, Luminance)
model is an intuitive, easy to use tool for describing or
modifying a color.
- Favorites displays all the favorite colors selected by you by clicking Add To Favorites in the Definition and Catalog tabs.
- Catalog displays standard colors defined. You can add a color to your favorites by clicking Add To Favorites.
When the intensity value exceeds 1, the color saturates.
In the first example, all color components (R, G, and B) are multiplied by intensity:
 |
 |
 |
|
R,G,B = 10,100,10 Intensity = 0.2 Result = 5,50,5 |
R,G,B = 10,100,10 Intensity = 0.5 Result = 10,100,10 |
R,G,B = 10,100,10 Intensity = 1 Result = 30,255,30 |
In this second example, when the intensity is higher than 1, R and B are the only components to be multiplied because G is already saturated:
 |
 |
 |
|
R,G,B = 40,255,40 Intensity = 0.2 Result = 20,128,20 |
R,G,B = 40,255,40 Intensity = 0.5 Result = 40,255,40 |
R,G,B = 40,255,40 Intensity = 1 Result = 120,255,120 |
To define more precisely the intensity, click  to
open the Intensity dialog box.
to
open the Intensity dialog box.
This dialog box lets you define three coefficients using the slider or by entering a value directly in the corresponding box:
- Ambient: defines the intensity of light emitted in any direction by the object, even if not lit by any light source
- Diffuse: defines the intensity of light diffused by the object when lit by a light source
- Specular: defines the intensity and color of light reflected in one particular direction. This coefficient affects the highlight on shiny surfaces.
These three coefficients only impact the material aspect. They are identical to those used to define material lighting properties (and are used in combination with them) but have no influence on the material definition.
 to reset
the light to its default position.
to reset
the light to its default position.  .
.