Measure | |
| |
- In the work area, select the entities you want to measure.
-
From the Tools section of the action bar, click Measure
 .
.
-
In the Measure dialog box, click the following:
Option Description Items Specifies the items to measure. Settings Specifies custom settings. -
Under Items, the following options are displayed:
Option Description Items to measure Displays the selected points, arc, edges, and faces to measure. Show measurements Displays the measured values in the dialog box. Note:- For measuring a single entity, the area and perimeter of the entity is displayed. If you select an edge of the entity and click Measure, the length of the entity is displayed.
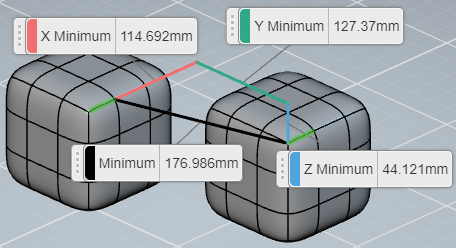
- For measuring distances between entities, refer to the example below.
Advanced Displays the advance option. Note: Under Alignment, you can select an axis system as a reference frame.
In the above example, the following measurements are displayed:- X Minimum shows the minimum distance between two edges on the X axis.
- Y Minimum shows the minimum distance between two edges on the Y axis.
- Z Minimum shows the minimum distance between two edges on the Z axis.
- Minimum shows the minimum distance between the entities.
Note: Measurements have unique colors in the graphics area and the Measure dialog box.
-
Under Settings, click Use custom settings
to customize the settings.
Option Description Dimension decimal places Controls the number of displayed decimal places. Displayed values are rounded to the number of decimal places selected from the list. Primary length unit Displays the primary length and area-related measurements in the selected unit. The supported units are Millimeter, Centimeter, Meter, Kilometer, Inch, Foot, Yard, and Mile. Primary angle unit Displays primary angle measurements in the selected unit. The supported units are Radian and Degree. Dual units Displays primary and secondary measurements in the selected units. Secondary length unit Displays secondary length and area measurements in the selected unit. Secondary angle unit Displays secondary angle measurements in the selected unit. -
Click
 to close the
displayed measurements and the Measure dialog box.
Note: You can use this command when another command is already running. For example, when modeling a part using the Extrude command, you can select the Measure tool from the Tools section of the action bar to start Measure tool. When the Measure tool is active, all selections apply to the Measure tool.
| See Also |
| More help on this topic |