About the Robot

The Robot lets you manipulate the position and orientation of objects. The Robot has three axes based on the XYZ global coordinates.

This page discusses:

Robot Handles

When the Robot is displayed, use the Robot handles to manipulate objects. By default, the Robot is displayed on the center of objects in the work area.

The components of the Robot are defined as follows:
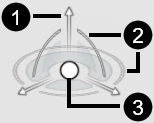
  • (1) Axis handle
  • (2) Arc handle
  • (3) Center handle

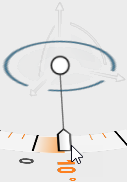
The axes, arcs, and center are the Robot handles. When you select a Robot handle, it turns blue and enables you to manipulate the position and orientation of the object. Drag the blue axis handles to move objects linearly along the selected axis or the arc handles to rotate objects about the selected axis. When a Robot handle is selected, a ruler is displayed.
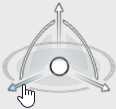
Axis handle
Arc handles


Center handle

Displaying the Robot

You can display the Robot by selecting one or more components in the design tree. Depending on the action bar command, the Robot or components of the Robot might be available.


This is the planar view of the Robot, typically used in the View > Normal To command. This is also the view when using the Align to Screen Robot option.


A single axis is displayed when the object is scaled or moved in a single direction. Drag an axis to scale or move objects along that axis. When a single axis is displayed with a command, you often have a Reverse option the dialog box to flip the direction of the axis.


Dark and light dots appear at the end of the axis arrow in some commands when you have the option to select or clear the axis. For example, if dark dots appear at the ends of the three axis arrows while scaling, you can scale two of the axes by selecting the dark dots (turning them to light dots). The third dark dot is not manipulated as you scale the other two.
Tip: You can hide a component work area and view the Robot by clicking next to the component in the design tree. Click to view the component again.

Moving Objects with the Robot

You can move a single or multiple objects at the same time using the Robot.

Note: To move a fixed component, you first have to float it (right-click the component and select Float Component ).

Drag the center of the Robot to move the object to a new location. The location of the object changes but the object's orientation remains the same.
You can detach the robot and adjust its position.

Click and release the center of the Robot to drag it to a new location. The object does not move. The Robot appears semitransparent indicating the mode change.

Click the center of the Robot again to reattach the Robot to the object with a new anchor point. The Robot is no longer semitransparent. Use the Robot in its new position to move the object.

Drag the axis of the Robot to move the object linearly in that direction. The object's orientation remains the same. Dragging off of the ruler displays incremental values. Drag on the ruler snaps to rounded values.
Drag an arc on the Robot to rotate the object on that axis. The object is rotated around its center, but the location of the object does not change. Dragging off of the ruler displays incremental values. Drag on the ruler snaps to rounded values.
Click the number opposite the ruler pointer, enter a value and click .
Drag the dot at the end of the axis arrow to scale the object linearly along the axis (in some commands). Multiple dots can be selected. Dark dots appear at the ends of the three axis arrows, if two dark dots are selected (turning them to light dots), both axes are scaled. Select three dark dots and scale the complete object.

Keyboard Functions with the Robot

You have additional Robot functions when using the keyboard.

  • Press Ctrl to temporarily hide all Robots.
  • While dragging the center of the Robot, press Alt to control whether the Robot maintains its current orientation or orients itself according to objects it moves over.
  • While dragging a Robot axis, press Shift allowing you to snap to geometries and objects points. This function is supported with both axis and planar dragging.
  • When rotating about the Robot Z axis, you can press Shift to snap the X handle to a chosen rotation point.
  • While dragging the Robot center, press Shift to snap the Robot to circle centers, line midpoints and endpoints, and vertices.
  • While dragging a Robot along a plane, press Shift to snap the Robot center to projection points of other objects.

  • While dragging a box Robot, press Shift to snap box sides to geometry.

Robot Right Mouse Button Options

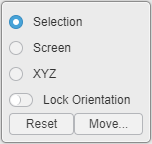
You can change the behavior of the Robot in the work area using options available when you right-click the Robot.

The options available are described as follows:

Selection When selected, the orientation of the Robot matches the orientation of the object.

This is the default option.

Screen When selected, the Robot is displayed normal to the view plane where the Z axis is always facing out of the display toward you.
XYZ When selected, the orientation of the Robot matches the XYZ coordinates as shown in the upper right corner of the work area. The Robot is also locked to, and snaps back to this orientation.
Lock Orientation When selected, the current orientation of the Robot is locked. Once you use the Robot to manipulate the object, the Robot returns to the orientation you locked.
Reset Resets the current orientation of the Robot. When the Robot center is in a detached state, any dragged geometry is moved together with the Robot until the Robot reaches the main XYZ axes orientation.
Move Move opens the Robot Move dialog box, which allows you to manually enter numeric values for moving the Robot. The Robot Move dialog box is described in the following table.

The Robot Move dialog box displays the functions that are available in the active Robot. Some elements of this dialog might be not shown, or disabled depending on context.


X Axis. Enter values in the box to reposition the Robot in the global coordinates along the X axis.
Y Axis. Enter values in the box to reposition the Robot in the global coordinates along the Y axis.
Z Axis. Enter values in the box to reposition the Robot in the global coordinates along the Z axis.