2D Graph Display
There are three ways to display a requirement 2D graph.
- From the tree
- Double-click a requirement object.
The requirement object and its first level children are displayed. You can then expand the children using the Expand command from the context menu. - From the context menu
- Right-click a requirement and select Open 2D Graph.
The requirement object and its first level children are displayed in a new window. - From an implementing function or logical component
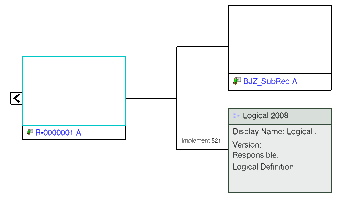
- Click the implement icon to display the list of implement requirements, and then double-click the convenient entity.
The parent of the implemented requirement is the root of the requirement 2D graph.

2D Graph Navigation
2D Graph Customization
By selecting the convenient options in , you can customize:
Implement Relation Creation/Deletion
- Creation
- Implement relations can be created through the 2D graph by dragging an entity from the tree (or another 2D graph window) and drop it to a requirement. The new implementing entity is displayed in the requirement 2D graph.
- Deletion
To delete an implement relation from the requirement 2D graph, select the link between a requirement and the implementing entity and use the Delete command (from the context menu or your keyboard). The Delete Implement Relation command available from the implementing entity context menu is also provided. The graph content is automatically updated with the link and the implementing entity removed from the graph.
|