Modifying Immersive Panels

You can interactively modify and configure the layout of the immersive graphical user interface (GUI).

This task shows you how to:

Create a Panel Stack

You can create a group of immersive panels by stacking them together.

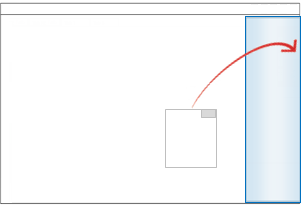
  1. To attach a panel to another one, drag its title bar to the title bar of another panel.
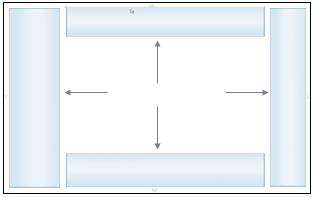
    A visual feedback is displayed on the target panel to let you know where the panel is to be attached.


    If you release the mouse button while the visual feedback is displayed, the moved panel is attached to the target panel. This means that they are dependent from each other for future interactions (move, resize, and so on).

    A group can contain as many panels as required and can also be resized. Then, the created group can be moved like a single panel, but all the contents of its embedded panels can be accessed through the tab present in the title bar.

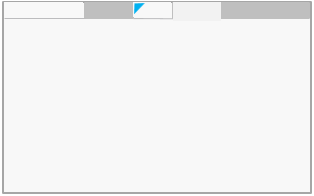
    Note: By default, only the contents of the active panel's tab is displayed. The active tab is displayed in a light gray background.

  2. To see the contents of several panels in the group at the same time, double-click the panel's tab to pin it.
    A blue visual feedback indicates that the panel is pinned.

  3. To unpin a panel in the group, double-click its tab.
  4. To detach a panel from a group, drag the title bar of the panel you want to detach, and move it away from the group.

    Important: The dock or pin state of immersive panels is stored in the preferences, which means that it is restored next time you run a session.

Dock Immersive Panels

You can dock immersive panels or dialog boxes, or groups of immersive panels or dialog boxes to the docking areas available in each widget.

  1. To dock a panel or a group to one of the four docking areas, drag its title bar close to an edge of the widget.


    The moved item becomes transparent. When you hover over a valid drop (a space the dialog box can dock into called the "docking area"), a visual feedback is displayed to let you know that you can drop the panel.

    Note: The visibility status of the tree or side panels and of the other docked panels has an impact on the visual arrangement of the docking areas.

    If you release the mouse button while the visual feedback is displayed, the moved panel is attached to the target area. Focus is automatically on the newly docked item (its tab is visually “on” and its content is visible).

    If another panel is already docked on the same area, the docked panels are organized into tab pages. Clicking a tab changes the tab in focus and the docking area slides out to reveal the content.

  2. To hide or display a docking area, click the appropriate arrow.

    Arrow Description
    or Hide or display the top docking area
    or Hide or display the left docking area
    or Hide or display the right docking area
    or Hide or display the bottom docking area

  3. To undock a panel, drag its title bar and move it away.

    If the undocked panel is the only one in the docking area, then the docking bar disappears because it is not relevant anymore. Otherwise, the last selected docked panel is visible in the docking area.

    Note: When a panel is interactively undocked, you can keep it as a stand-alone floating panel, or you can dock it to another valid docking area.

Collapse Immersive Panels

You can collapse immersive panels, whether docked or not.

  1. Double-click the title bar of the panel you want to collapse.
  2. Inversely, to expand a collapsed panel, double-click its title bar again.