About Design Space Checks | ||||
|
| |||
The design space is the space enclosed by the range of every design variable in the study. You create the design space as you specify the limits for each design variable. It is the framework within which you conduct a study.
Design space checks verify that the model, mesh, and scenario features are valid for a set of points throughout the design space. The checked points are representative points; they might not match the design points analyzed when you run the study. By testing a sufficient number of points, you can identify potential problems that might prevent a successful study. For example, certain combinations of design variable values might fail to create valid geometry. You can revise the model or change the range of some design variables to reduce the chances of failure when you run the study.
The
number of points to sample is calculated based on the number of variables that you are
changing in the study. You can increase or decrease the number of sample points to
control how thoroughly the design space is checked. You can review the sample points for
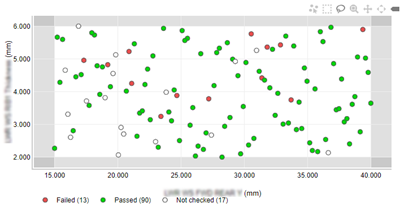
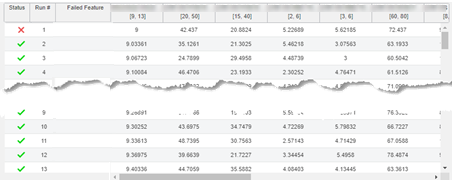
the design space using scatter plots or a table, as shown in the examples below.


Scatter plots provide a visual indication of the range covered by each variable. You can see the points to sample and how they are arranged. You can determine which points are closest to the limits of the study range. However, scatter plots can display only two variables at a time. If you are changing more than two design variables in a study, you must review multiple scatter plots to understand the distribution throughout the design space. By changing the variables shown on each axis, you can review how the points for those variables are distributed. You can click individual points to display the input values for each design variable at that point.
You can review failed points in either view. You can use the context menu to center the tree on a failed point. The Failed Feature column in the table view indicates the design feature that failed for that point. When you hover the pointer on a failed feature, a tooltip indicates details about the cause for failure.
You can also choose the level of checks to complete. If your study changes only variables inherent to the model (such as the dimensions) and there are no loads applied, model checks might be enough. If your designs vary the loads applied in the structural analysis case, you must run all checks to ensure that the model, mesh, and scenario are all valid. A complete design space check applies the model changes, updates and validates the mesh, and updates the scenario features.
Design space checks test a number of points to assess the basic feasibility of design variable combinations in your study. For example, a model that includes several dimensional variables might have ranges that are valid when you change them independently. However, if you change multiple variables at the same time, the model might intersect itself. You can review any points that fail and modify the study (range of the design variables) or, possibly, create new parameters to control and prevent the poor interactions.
The results of the design space checks identify how to proceed. If any of the points failed, you can investigate and look for patterns to identify whether you need to change one or more of the design variable ranges. Eliminating failures here helps prevent wasting computational resources when you run the study.
For the scatter plot, you can change the variables shown on each axis to review how points are distributed for those variables. You can click individual points to display the input values for each design variable at that point.
The Failed Feature column indicates the design feature that failed. When you hover the pointer on a failed feature a tooltip indicates the reason for the failure. You can also use the context menu to center the tree on the failed point, the same as you can from the scatter plot view.