About Rules | ||
| ||
Rules allow you to change the input fields that are presented to a user when they are instantiating a custom template and creating a simulation process. In addition, the same rules that you define in Process Experience Studio are applied when a user is configuring the simulation process in Performance Study.
For example, you can create a rule in a text input component that displays a temperature input field only when the user turns on a temperature dependency check box. The rule used to create this behavior is show in the figure below: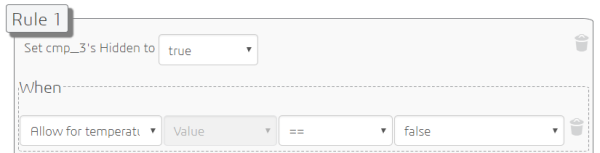
The behavior of the text input field is shown in the figure below. When the user turns on the check box, the temperature input field appears.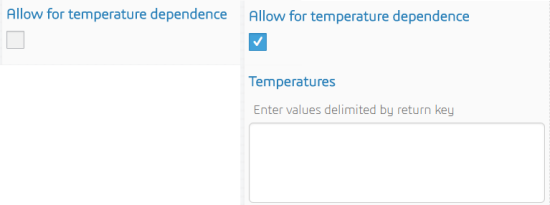
Click Add Rules  from the Property Editor, to create or edit a rule. Rules are available for the following properties:
| Property | Rule-based Action |
|---|---|
| Label | Change the label that appears with the field |
| Read Only | Make the content of the field read only or allow the user to edit the content |
| Mandatory | Require a value or allow the user to leave it empty |
| Hidden | Show or hide the field |
You must specify the conditions that must be satisfied for the rule to be true. A condition is always based on the value of a component; for example, a condition can be satisfied when the value of a component exceeds a specified number.
You can specify multiple conditions. All of the conditions must be satisfied for the rule to be true. Similarly, you can specify multiple rules for a property. If more than one rule is satisfied, the value of the property is controlled by the last rule created (the highest numbered rule). You cannot change the order in which the rules appear in the Rules Editor.
After you create a rule, Process Experience Studio highlights the property in purple in the Property editor, to indicate its value is controlled by a rule.