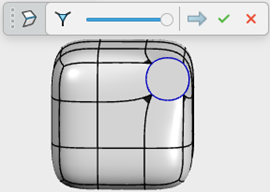
Creasing Edges on a Subdivision Face | |
| |
-
From the Subdivision section of the action bar, create a 2D or 3D subdivision object.
Note: A 3D Box is used in this procedure.

-
From the
Subdivision section of the
action bar,
click
Crease Edges
 .
A command toolbar appears with the following commands:
Command Description Command Icon On a subdivision object, when you launch a command with a command toolbar, the active command icon is displayed on the drag handle of the toolbar. In the screen capture above this table, the Crease Edges icon is shown. 
Smooth Crease. Controls the weighting of the surface through the chosen edges. 
Percentage of the crease. Makes the crease sharper if the percentage is higher. 
Accept and Continue. Accepts the current result and continues in the current command. 
OK. Accepts the current result and closes the command. 
Cancel. Cancels the command. - Select one or more edges or faces in the mesh you want to modify.
-
Drag the Smooth Crease slider to adjust the edges of the
selected faces. The edges of the faces become sharp. You can adjust the
sharpness of the edges by controlling the weighting of each edge. The selection
becomes sharp or rounded based on the smoothness of the crease.
Based on the value of the Smooth Crease slider, a different color is displayed to indicate smooth or sharp creasing.
- If the creased edge is sharp with the slider value equal to 100, the
edge is displayed in the following color:

- If the creased edge is sharp with the slider value between 1 to 99,
the edge is displayed in the following color:

- If the creased edge is smooth with the slider value equal to 100,
the edge is displayed in the following color:

- If the creased edge is smooth with the slider value between 1 to 99,
the edge is displayed in the following color:

- If the creased edge is sharp with the slider value equal to 100, the
edge is displayed in the following color:
-
Click
 .
.
| See Also |
| More help on this topic |