Creating Mapping and Metadata Files

The different tasks below show you how to create mapping and metadata files.

This task shows you how to:

Creating Mapping and Metadata Files with Customized Attributes

This task shows you how to create mapping and metadata files with customized attributes along with all the OOTB attributes.

  1. Run the LegacyCustoGenerator application, from the installation, with the NOCUSTO option:

    mkrun -c "LegacyCustoGenerator -source VP5 -user {UserName} -passwd {password} -role {ROLE} -serverURL {VP5ServerURL} -inputXML {LocationofInputXML}"

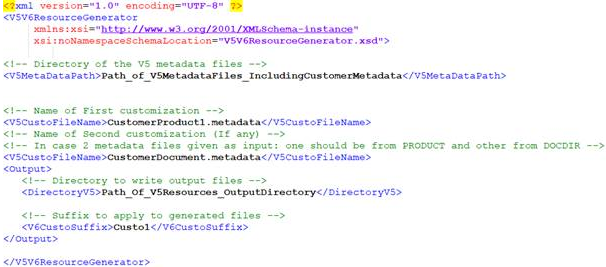
    1. In the input XML, specify the disk location of the V5MetaDataPath and the output directory for resource generation.
      Here is an XML sample:

      The LegacyCustoGenerator application will generate the mapping and metadata files with all the available OOTB attributes at the output directory location specified in the input XML.

      3DEXPERIENCE client resources will be generated in the client installation in the respective folder / location.

  2. Replace all the V5 server resources (generated in the V5 directory path) in the server installation directory at:

    Installation/aix_a64/resources/3dlive/release_folder (specific to the client level)

  3. Replace the contents of the VP5MappingDS.mapping.xml file with that of the newly generated mapping file VP5Mapping.mapping.xml. The files on the VP5 server are located at:

    Installation/aix_a64/resources/3dlive/release_folder (specific to the client level)

  4. Rerun, from the installation, the LegacyCustoGenerator application with the customer metadata files pointing to the ENOVIA VPM V5 server where the mapping and metadata files in the LegacyCustoGenerator in NoCusto mode are kept:

    mkrun -c "LegacyCustoGenerator -source VP5 -user {UserName} -passwd {password} -role {ROLE} -serverURL {VP5ServerURL} -inputXML LocationofInputXMLwithCustomerMetadata}"

    1. In the XML input, specify the disk location of the V5MetaDataPath, the customer metadata names, the 3DEXPERIENCE custom suffix and the output directory for resource generation:
      Here is an XML sample:
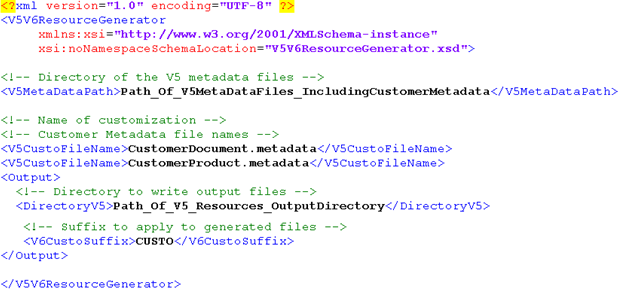
      The LegacyCustoGenerator application will generate the mapping and metadata files with the customized attributes along with all the available OOTB attributes at the output directory location specified in the input XML.

      3DEXPERIENCE client resources will be generated in the client installation in the respective folder / location.

  5. Replace all the V5 server resources (generated at the V5 directory path) in the server installation directory at:

    Installation/aix_a64/resources/3dlive/release_folder (specific to the client level)

Creating Mapping and Metadata Files with Multiple Customization of the Same Domain

This task shows you how to create mapping and metadata files for two customized Parts and one customized document metadata file.

  1. Run the LegacyCustoGenerator application from the client installation path with the first customized Part metadata file (PARTCUSTO1) and the customized document metadata file (DOCCUSTO). Do as follows:
    1. Run:

      mkrun -c "LegacyCustoGenerator -source VP5 -user {UserName} -passwd {password} -role {ROLE} -serverURL {VP5ServerURL} -inputXML {LocationofInputXML with PARTCUSTO1 and DOCCUSTO Customer Metadata}"

    2. In the input XML, specify the disk location of the V5MetaDataPath and output directory for V5 resource generation.
    3. Since you are running the command from a client installation, 3DEXPERIENCE resources will be generated directly in the respective folder / location.
      Here is an XML sample:

      The LegacyCustoGenerator application will generate the mapping and metadata files with one customized Part (PARTCUSTO1) and the customized document (DOCCUSTO) at the output directory location specified in the input XML.

      3DEXPERIENCE client resources will be generated in the client installation at the respective folder / location.

  2. Replace all the V5 server resources (generated in the V5 directory path) in the server installation directory at:

    Installation/aix_a64/resources/3dlive/release_folder (specific to the client level)

  3. Replace the contents of the VP5MappingDS.mapping.xml file with that of the newly generated mapping file VP5Mapping.mapping.xml. The files on the ENOVIA VPM V5 server are located at:

    Installation/aix_a64/resources/3dlive/release_folder (specific to the client level)

  4. Activate the variable: LVV_RESOURCE_GENERATOR_ALLOW_ONE_CUSTOMIZATION=TRUE in the client CATEnv or on the command prompt where the LegacyCustoGenerator command is run.
  5. Rerun, from the installation, the LegacyCustoGenerator application with the second customized Part metadata file PARTCUSTO2 pointing to the ENOVIA VPM V5 server where the mapping and metadata files of LegacyCustoGenerator with PARTCUSTO1 and DOCCUSTO are kept. Do as follows:
    1. Run:

      mkrun -c "LegacyCustoGenerator -source VP5 -user {UserName} -passwd {password} -role {ROLE} -serverURL {VP5ServerURL} -inputXML {LocationofInputXMLwithPARTCUSTO2CustomerMetadata}"

    2. In the input XML, specify the disk location of V5MetaDataPath and the output directory for V5 resource generation.
      Here is an XML sample:

      The LegacyCustoGenerator application will generate the mapping and metadata files with PARTCUSTO2 attributes along with PARTCUSTO1 and DOCCUSTO attributes at the output directory location mentioned in the input XML.

      3DEXPERIENCE client resources will be generated in the client installation at the respective folder / location.

  6. Replace all the V5 server resources (generated in the V5 directory path) in the server installation directory at:

    Installation/aix_a64/resources/3dlive/release_folder (specific to the client level).