-
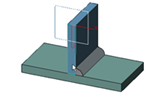
Open the assembly containing the weld and edit the weld feature. Our example uses a fillet weld.
- In the Fillet Definition dialog box, click the Manufacturing tab.
Multiplicity is set to Single. - Click Cancel.
-
Create a new drawing.
You are now in the Drafting app.
- Select the xml standard file in the Generative view style dialog box.
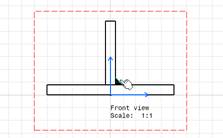
- From the View Layout section of the action bar,
click Front View
 and select a face on the assembly. and select a face on the assembly.
The preview appears in the Drafting app. - Click on the drawing to generate the front view.
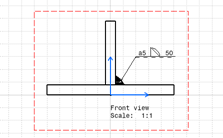
- From the Annotation section of the action bar,
click Welding Symbol View
 and select the weld on the drawing. and select the weld on the drawing.
- Click on the sheet where you want to create the annotation.
The weld annotation is created with the information specified in the weld feature: weld
thickness and length values appear.
- Click Cancel in the Welding creation dialog box.
-
Back to the Weld Design context and edit the weld feature, modify its thickness.
- Click OK in the Fillet Definition dialog box.
- Back in the Drafting app, click Update All
 . .
|
