3-Axis Explode Dialog Box | ||
| ||
Initial Explode Axis
- Along Axis
- Use the arrow to select they required axis.
This identifies the initial direction of the explode. However, in most cases, you are able to intuitively know the most possible initial direction. Therefore, you can help the algorithm to run much faster by selecting the initial axis of explode.
You first need to enable axis selection by activating the it and choose one of the axes from the list.
 By default, X is selected.
- Fixed Object
- Select any particular object as fixed object through the panel. Click in the Editor
next to the label Fixed Object to select any object as fixed
object (1) below.
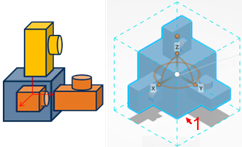
If you do not select any fixed product, for any given direction of explode, the command identifies one object (the middle object) as Fixed Object. Example, if N objects are exploded in one direction, the N/2th or (N-1)/2th object is considered as Fixed Object.
You can select only one object as fixed object. Hence, if you need to change the fixed object, it is required click in the editor each time. Once the fixed object is selected, you are able to continue with either selecting more objects for explode or remove existing objects. However, if you clear the object that is selected as fixed object, the following warning message is displayed and the editor is cleared: Fixed object is removed from selection
Note: Only objects selected for explode can be specify as fixed object. You are unable to select any other object as fixed object. By default, nothing
is selected.
 - Distance (mm)
- Select to change the required distance for the objects to explode. The distance
provided in the panel is applied between two consecutive objects exploded in the same
direction. This is the distance between the boundaries of the two objects.
 By default,
5.00 is selected.
- Explode
- Click to explode.
Distance between the objects is calculated from one object’s far edge (bounding box edge point) to another object’s near edge (bounding box edge point). This is along the axis of the explode.
Distance between the exploded objects is respected only after clicking. After, an explode with a specified distance, you can continue to specify the position of objects through the handle; then distance may not respect the distance value.
- Robot behavior:
At the start of 3-Axis Explode, if there are no objects in the selection the robot appears at the origin. When there are any objects in the selection, or you select objects after launching the command, a bounding box appears. This encompasses all the selected products and the robot is placed at the center of the bounding box.
- Robot Manipulation:
You can rotate the robot along the X, Y, and Z axis to change the orientation. This functionality is useful if the selected objects cannot be exploded along any of the orthogonal axes. Change the robot orientation and align it to a direction along which objects can be exploded.
Rotating the robot, a ruler is displays.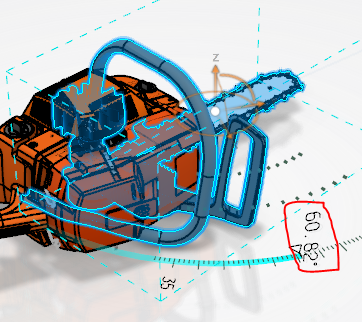
You can change the angle by editing the value or by dragging the triangular shaped object present on the ruler. Ruler is hidden during the explode.
- Robot Manipulation:
- Explode using Robot: You can drag the robot to explode
selected objects.
After the selection or modification of selected objects, if the first explode completed, you can manipulate the distance between objects by moving the robot along one of the axes. Drag a robot along the positive direction of objects are moved apart. Example, the distance between the objects increases. Drag the robot along the negative direction the objects are brought closer. Example, the distance between the objects decreases.
If the first explode is performed by dragging the robot the following message displays and objects get exploded once computation is done:This is first explode after modifying selected objects. There may be a lag during dragging due to initial computation.
Dragging the robot the distance it updates in the panel. If you drag the robot along the positive direction the distance in the panel increases.
- Workflow: You can also preselect the set of objects and
then start the command to explode. Once an object is selected, selecting it again
removes it from selection.
- Use case 1: The command identifies that the assembly
could be logically exploded in one direction alone, the positive
X-direction.

Then the assembly is exploded by positioning the objects in the right order of disassembly. The objects are positioned apart with the distance provided in the panel between them. If a set of objects is identified as a group, then they are positioned together (in the same plane) providing meaningful view. - Use case 2: When there are sub-assemblies that cannot
be completely disassembled in the first direction of explode, the algorithm
first moves the whole sub-assembly as one unit in that direction. Then, it
identifies the next direction in which the sub-assembly can be exploded and
explodes in that possible direction.

- Use case 3: Explode in all three directions.
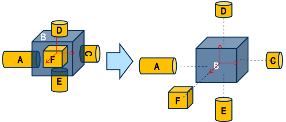
- Use Case 4: Explode in all three directions with a
fixed object. If the cube in the center (blue cube) is selected as the fixed
object, the result of explode is shown on the right side.
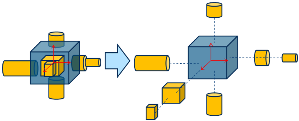
- Use case 5: In cases where the explode would not be
coherent with the expected result, you can perform multiple explodes by
selecting different groups of objects. When all the objects are selected for
explode, it would result in the noncoherent explode.
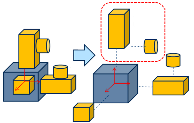
Hence, you can perform multiple explodes to arrive at the coherent result.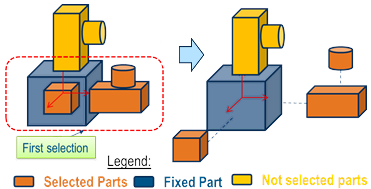
Launch 3-Axis Explode again. Select Initial Explode Axis as Z and perform explode again with selected objects.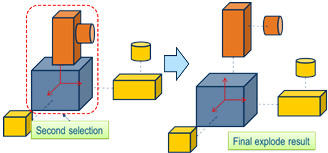
- Use case 1: The command identifies that the assembly
could be logically exploded in one direction alone, the positive
X-direction.
- Robot behavior: