Data Collect Row and Data Collect Checklist Row Dialog Boxes | ||||
|
| |||
When authoring a new row, all fields are available for edit. However, when reopening the dialog for modification of a row, you are no longer able to modify the Type, Mode, or Magnitude.
Row Type Options
- Real

- If this option is selected, specify the Magnitude. This
determines the units used in the values. For example, if the
Magnitude is specified to Angles, the
units are appropriate for angles. In cases, such as that for length, where magnitude can
be expressed in more than one way. An example is length can be expressed in inches or
centimeters, the sub option values are determined by selecting in Me
 > Preferences.
You can limit the range of valid values by using minimum and maximum values. When you specify minimum and maximum values, you can choose whether the values are included in the range of allowed values.
The Magnitude field is a prepopulated list of the most commonly used magnitudes as read from the file.
resources\msgcatalog\DELWKIDataCollectPlan.CATRscThis allows you to customize the list of names that you would like displayed. In addition, a More command loads the remaining magnitudes from the database.The Unit field is automatically repopulated when the magnitude changes. By default, the unit field is blank. In this event, the units pull from your preferences. Otherwise, select the unit in which you want to display their data.
The Min/Max/Nominal Value fields automatically assign the specified unit after the editor has been closed.

Unlike the existing Data Collect Dialog, the validation is not done at the time of entry, but instead when OK is selected. If one of the values is out of range, a message appears like, Value is outside the bounds of the Maximum.
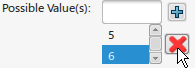
Note: You can create a list of valid values. Once you enter a value and click Add Value , a new field opens beneath the first, and the original field
has Remove Value
, a new field opens beneath the first, and the original field
has Remove Value
 next to it. That is, the last field is always blank and
associated with Add Value.
next to it. That is, the last field is always blank and
associated with Add Value.
- Integer

- If this option is selected, you must input an integer. Specify Minimum and Maximum
values, and choose whether the values are included in the range of allowed values. Here
the values can be added using the Add
Value
and display in a list instead of individual editors. Values can be removed by
clicking the list and selecting Remove
 .
.
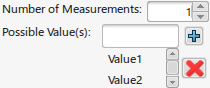
- Text

- If this option is selected, you must input text in the Mode: Instruction
Test window. You can enter a list of valid values. Here the values can be
added using the Add Value
and display in a list instead of individual editors. Values can be removed by
clicking the list and selecting Remove
.
- Boolean

- If this option is selected, the MES user must input a Boolean value. You can select
among several possible values. This dialog, however, is populated from
DELWKIDataCollectPlan.CATRscinstead ofBooleanDataCollect.CATRsc.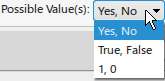
 By default, no value is selected.
 - Time Stamp

- The special feature of the Timestamp type layout is these Possible values. It contains
a list of formatting options, which are populated from
DELWKIDataCollectPlan.CATRsc.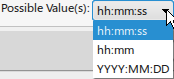
Mode
- Collected
- You can collect the Data Collect Row.
- Computed
- You can compute the Data Collect Row. For the Computed mode, only Real type is supported. The formula can be defined only for a Real type. You can define a Text Instruction, Label, Display unit . Specify the unit to use in APRISO to display the computed value.
Instruction Text
Dependent on your selection, the default Use Formatted Text, or Use Plain Text in Authoring Preferences, your dialog box varies.
- Collected
- You can collect the Data Collect Row.
- Computed
- You can compute the Data Collect Row. For the Computed mode, only Real type is supported. The formula can be defined only for a Real type.
Minimum and Maximum Control Value Attributes
Click Play to watch the video:
The current Min Value and Max value attribute available on a Data Collect Plan Row are functional tolerances based on design specification.
Control Limits (Control Min and Control Max) are for statistical process control. Example, to control the quality of production on the shop floor.
As a result, the Control Limits specified need to be more restrictive than the current Min/Max values specified on a Row.
- The Control Min must be greater than or equal to the Min value.
- The Control Max must be less than or equal to the Max value.
You have the capability to specify Control Limits on a Data Collect Row.

Fields in the Data Collect Plan Row editor allows you to enter Control Limits (Control Min/Max). Control Limits is available for Rows of type REAL and INTEGER.
Logic Checks
The following consistency verifications happen when clicking OK/Apply in the Row editor.
Control Min value:
- Does not accept until entering a corresponding Min value.
- Has to be greater than or equal to the Min value.
- Has to be less than or equal to:
- The Nominal value (if specifies a Nominal value.)
- The Control Max value (if Nominal unset and specifies a Control Max.)
- The Max value (if Nominal and Control Max are both unset and specifies as Max.)
- Unset if you unset the corresponding Min value.
Similarly, entering Control Max value:
- Does not accept until you enter a corresponding Max value.
- Has to be less than or equal to Max value.
- Has to be greater than or equal to:
- The Nominal value (if specifies a Nominal value.)
- The Control Min value (if Nominal unset and specifies a Control Min.)
- The Min value (If Nominal and Control Min are both unset and specifies as Min.)
- Unset if you unset the corresponding Max value.
Units
Units for Control limits manage the same way as for Min/Max/Nominal.
- If specified preferred units for the Row, then the Control limits display in those units.
- If not specified any units, then the Control limits display in the default units specified in the Me/Preferences.
Reporting / Output
Similar to Min/Max/Nominal, the Control Limit Min/Max values:
- In the output created by the Generate Documentation for Operation / all Operations commands in Work Instructions app.
- In the output generated by the Systems Report Generationapp (Web app).
Label
This adds a Label to distinguish this Instruction.
Possible Values
The Possible values for the Checklist row. Select:
- Yes or No.
- True or False.
- 1or 0.
Resource Link
- Resource Link - Add
- Select to add a resource link in the Capable Resources dialog box.
- Resource Link - Remove
- Select this to remove a resource link.
The Capable Resources allowed for linking are the Preferred Primary Capable Resource. This includes its corresponding Secondary Capable Resources that are linked to the Header Operation of the Step Operation that is active in the filmstrip.
On mouse-over the window, a tooltip displays showing the full display name of the Resource. This is helpful when the name is longer than the visible width of the field.