Creating Features from Sketch Mode

You can apply an extrude feature from Sketch mode.

This task shows you how to:

Drag an Extrude from a Sketch

You can drag the Robot in the sketch to add an extrude.

  1. From the Sketch section of the action bar, sketch an entity.
  2. Click the entity.
    When you select the entity a context toolbar appears.

    The Robot arrow only appears when you select the shading of a closed contour object, and does not appear with open contours.
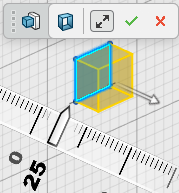
  3. Drag the Robot arrow.
    When dragging the arrow, you leave sketch mode and a new context toolbar appears.

    Note: You can specify the extrude distance by dragging the arrow, sliding the indicator on the ruler to snap to rounded-off values, or enter a value by double-clicking the number.
  4. From the context toolbar, click Finish command .


    To cancel the command, click Cancel command .

Extrude a Surface from a Sketch

You can drag the Robot in the sketch to add a surface extrude.

  1. From the Sketch section of the action bar, sketch an entity.
  2. Click the entity and drag the Robot arrow.
  3. From the context toolbar, click Surface .
  4. From the context toolbar, click Finish command .

Open the Extrude Command from a Sketch

You can drag the Robot in the sketch and open the extrude dialog box.

  1. From the Sketch section of the action bar, sketch an entity.
  2. Click the entity and drag the Robot arrow.
  3. From the context toolbar, click Expand .
    The context toolbar closes and the Extrude dialog box opens. Depending on the command, the appropriate dialog box opens.
  4. Select the options within the command dialog box.
  5. After selecting the options within the command dialog box.
    • From the top of the dialog box , click Collapse to revert back to the context toolbar.
    • Click to apply selections and close the dialog box.

Other Extrude Commands from a Sketch

You can drag the Robot in the sketch to do an add or cut extrude.

  1. From the Sketch section of the action bar, sketch two entities.
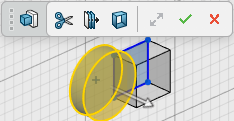
  2. Click one of the entities and drag the Robot arrow.

    In this example, the rectangle has already been extruded. You have the option to add the circle to, or cut the circle from, the rectangle.

  3. The following combinations are available:
    • From the context toolbar, click Cut to cut the extruded entity from the unselected entity.
    • From the context toolbar, click Cut and Through One Way to cut the extruded entity completely through the unselected entity in one direction.
    • Do not select any icon and proceed to the next step to add the extruded entity to the unselected entity.
    • From the context toolbar, click Through One Way to add the extruded entity completely through the unselected entity in one direction.


  4. From the context toolbar, click .