Marking Places on the Globe | |||
| |||
-
From the Markers section of the action bar, click Add
Marker
 .
.
-
In the Marker Editor dialog box, define details bout the
marker.
Option Description Color Lets you define the color to be applied to the marker symbol. To do so, click the color rectangle on the left then use the color chooser to select the new color. The way you change color depends on the browser you are using. On Chrome or Firefox, you have to click the color rectangle to open the color chooser whereas on Safari, you have to enter the hexadecimal color value ("#RRGGBB") directly in the color box.
Name Lets you enter the marker name. Latitude/Longitude Lets you set values for latitude and longitude in decimal degrees (with numeric float values) using the current system decimal separator. Other latitude and longitude formats, such as degree/minute/second (DMS), are not supported. The values are bounded by ±85° and ±180° respectively.
Important: - You can copy latitude or longitude values then paste them separately in the appropriate editable box. Comma-separated strings containing both latitude and longitude values are not supported.
- Longitude in the Western hemisphere and latitude in the Southern hemisphere must be entered as negative values. N (North), S (South), E (East) and W (West) suffixes are not supported.
- Any latitude or longitude value exceeding the valid range (±85° and ±180°) is automatically constrained to the nearest acceptable and displayable value in the range.
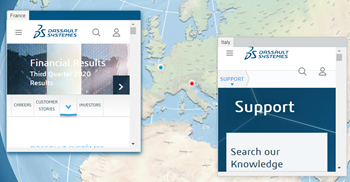
Description Click the type you want to use to describe the marker: Text, HTML, or Markdown. Text Lets you type a brief overview of the marker in the Text box. HTML Lets you enter a link to an external web site in the URL box. The link is displayed as a small content in a popup when the marker is selected to replace the default name/description. It is intended to be used with the URL of a simple image or basic HTML page specifically adapted to display such contextual information in a small area; it is not intended to display a whole external website directly in Globe Viewer. Therefore, this link should not be a website related to the marker, but can be used to display a small HTML page containing either an illustration image of the marker and/or an hyperlink to another web page.
Define the popup size in the Width and Height boxes.
Activate the Persist frame on widget option to keep the description displayed whether the associated marker is selected or not. This lets you have several information linked to different markers at the same time.
The persistent frame first opens in the upper left corner of the widget, but you can drag it afterward to a new location if required.
To edit the frame dimension, drag in the map. The frame position is stored proportionally to the widget size. Thus, if the widget is shared, the other user gets the description frame at the same position than the first user.
The description of the selected marker is identified by a blue color (the color is grey by default when unselected).
 Note:
Note:- Persistent frames are not impacted by camera moves or zooms.
- Persistent frames cannot be configured in a geojson input file.
- This option is available only for HTML descriptions.
Markdown Lets you use a standard language for styling all forms of writing on the GitHub platform. For more information, see https://guides.github.com/features/mastering-markdown/. Enter a description in the Text Area box. You can also drag the lower right corner of the box to increase or decrease the height.
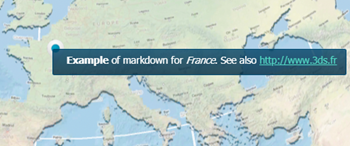
The markdown text is then automatically interpreted when the description frame is displayed.
You can change the dimensions of the result window by dragging in the map but the changes are kept across sessions.
Note: Markdown features cannot be configured in a geojson input file. -
Repeat the previous steps as many times as necessary to create additional markers on
the globe.

- Optional:
To modify marker-related information afterward, make sure Edit
Marker
 is activated then click the marker to be modified.
-
To remove a marker, click Edit Marker
,
click a marker on the globe, and then click Remove in the
Marker Editor dialog box.
- Optional:
To remove all the markers at once, click Reset All
 from the Manage section of the action bar.
Warning: As indicated by the command name, all markers but also all colored countries are removed. - When finished, click Save
 .
.In addition to markers, this command also saves colored countries.
-
Depending on the command that was previously activated, click Add
Marker
or Edit Marker
to exit marker mode.