Install and Configure XPGClientService
-
Open a command prompt with administrator rights and go to
${ClientInstallation}\${OS}\code\bin -
Enter the following command.
XPGClientServiceStarter.exe -I [[-direnv envdirpath] [-env envfilename][-ServiceName servicename] [-Port portnumber] [-deleteLocalLogs] [-debugLevel] [-doNotUploadLogs]]Where,
Option Description -IInstall the service.
Note: This is a mandatory argument.–direnvThe environment directory to be used. –envThe environment file name to be used. –ServiceNameName of the Windows service or XPGClientService.
Note: Ensure that the service name is unique.–PortPort number on which service should start.
Notes:- The port number must not be in the range 49152 to 65535.
- With a firewall in place, you need to open the port specified for the XPGClientService.
For example: If the Windows Firewall is On, you should open the port specified for the XPGClientService by creating an inbound rule in Control Panel > Windows Firewall > Advanced settings.
-deleteLocalLogsAutomatically deletes the local XPDMImportExportBatch logs from the report directory. Note: If the execution fails or finishes with a warning, the local logs are deleted after uploading them to the File Server.-debugLevelProvides detailed information for debugging. The following files and traces are generated in the report directory: ExecutionTraces.txtcontains execution traces.Environment.txtcontains the dump of the environment used during execution.- The client-server chat traces in a dedicated folder.
- The connection parameter file.
Note: The–debugLeveloption enables a detailed information generation for all events. In order to enable it only for a particular failed event, use the Retry (Activate Debug Information) option in the Gateway console.-doNotUploadLogsPrevents upload of the local XPDMImportExportBatch logs to the file server if the execution fails or finishes with a warning. Notes:- If a user runs the command without any arguments except
-I, the service is installed with the default name XPGClientService on default port 1099 using default environment. - The parameters listed in the above table cannot be modified after installation.
Press Enter.
- Go to Windows Services Control Manager.
- To configure XPGClientService, right-click
XPGClientService (or the service name specified in step2) and select Properties.
The XPGClientService Properties window appears.
- Click the Log On tab and select This account.
Ensure that the Windows account user creating the connection parameter file for XPDMImportExportBatch is specified in the This account box.
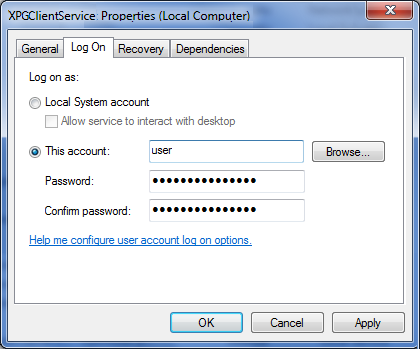
- Click Apply.
- Click OK.
- In Windows Services Control Manager, right-click XPGClientService and select Start.
The Windows service, XPGClientService starts.