-
From the Concept section of the action bar, click Layers
 . .
The Layers Menu opens and a Properties (Properties and Result) element is added in the first level of the tree. A default Layer.1 with a default thickness value, a default material and connection is available.
-
In the Layers Menu, add two additional layers by clicking Add Layer.
The new layers are added in the Layers subtree of the Properties (Properties and Result) element.
- Optional:
Change the values of the layer attributes Color, Thickness, Material, or Default Connection.
-
Select a layer, right-click and select
 Assign to Surface or click the Assign to Surface option.
-
In the work area, select concept surfaces and click
Assign Layer?
 . .
The layers are assigned to the selected concept surfaces. 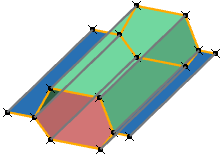 In the tree, a Properties element with the assigned layers is added to the module containing the concept surfaces. The check marks on the layer icons indicate, that they are assigned to concept surfaces. -
From the Concept section of the action bar, click Mesh

A Finite Element Model is created with a mesh part and a shell section for each layer. 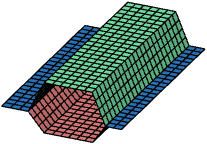
|
 .
.