Creating a CRS

If you need a specific CRS that does not exist in the online EPSG registry, for example a compound CRS that combines both a vertical CRS (to take into account elevation) and a projected CRS, you can create a CRS specific to your project. To help you find the reference information you need to use the content delivered along with your app, you can consult the 3DEXPERIENCE Native Apps Content User's Guide.


Before you begin:
  • Identify the CRS's you need and retrieve them in GML format from the online EPSG registry.
  • Create an XML file in GML format combining both CRS's
The app optional content is not automatically installed along with the code. Contact your administrator if you must install the files you need. For more information, see Install Optional Content. You can also see Installation and Setup:Install: 3DEXPERIENCE Platform: Installing 3DEXPERIENCE Platform Services for the First Time: Installing Services One-by-One: Native Apps: Installing Native Apps: Installing a Native App.
See Also
About Data Setup for Building and Civil Assemblies
  1. Copy 
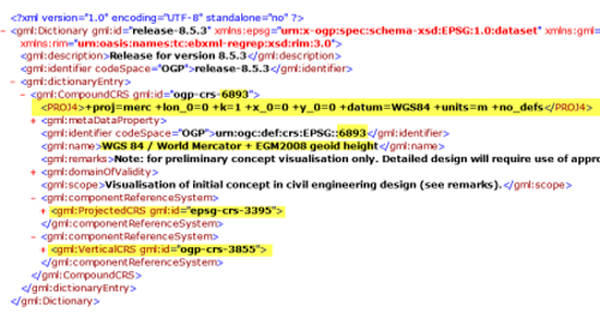
epsg-crs-6893.xml located in win_b64\startup\CRS, rename it, and replace the code accordingly. In the example below, the lines marked in yellow need to be edited.


  2. Open the two CRS GML files to combine.
  3. In the new GML file, replace <gml:ProjectedCRS> with the node found in the first GML file.
  4. In the new GML file, replace <gml:VerticalCRS> with the node found in the second GML file.
  5. Edit the <PROJ4> element and specify the parameters for the new CRSs.
  6. Save your GML file.
  7. From the Compass click 3D Modeling Apps , and select Building and Civil Assemblies.
  8. In the top bar, select Add > Content in the list (or press CTRL+N).
  9. Search for coordinate reference system in the Type list.
  10. Under Geolocation, click Geolocation coordinate reference system.
    The File dialog box appears.
  11. Select the CRS GML file.
    The attributes are specified automatically.
  12. Click Finish.
    The CRS is created.
  13. Save it.
    You can now reference it in Data Setup.